Privileged Discovery Query
Privileged Access Management (PAM) includes an option to run a discovery across your network to locate and report on found privileged endpoints and their configurations.
This scan can be configured to be automatically run at scheduled intervals and the resulting report can be used to create new records that can immediately be placed under management.
In addition, the Auto-Import option will create Records for newly discovered hosts.
With the Privileged Access Management Discovery, you can expect:
- A scan of your corporate network that will identify all endpoints that respond.
- A regular report that includes a list of all endpoints discovered as well as information about itself.
- To more easily create managed records from endpoints found that are categorized as privileged.
- Multiple options that will allow for customizing the scan to fit the design of your requirements.
Discovery Query Report Actions
Discover Queries
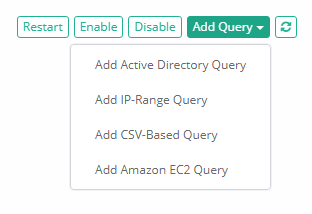
The following discovery queries are available.
- Active Directory Query: This query creates a scan across the entire network using the supplied Active Directory account(s) to attempt to communicate with all found endpoints.
- IP-Range Query: This query creates a scan across a specific range of IP address (From – To) and attempts to communicate with the found endpoints using PowerShell (Windows) and SSH (Unix/Linux) in combination with the supplied account(s).
- CSV-Based Query: This query creates a scan based on the endpoints that are supplied using an external CSV file. If a list of endpoints is already available to your, then this option will use that for the input of the scan and attempt communication using PowerShell or SSH in combination with the supplied account(s). Click to download a sample CSV template.
- Amazon EC2 Query: This query creates a scan based on accessible EC2 images running in Amazon AWS environments. AWS Keys, regions, credentials and other information is required in order to successfully complete this query. For more information, please read our Discovery for AWS article.
Creating a Discovery Query
How to create an PAM Discovery Query.
- Login to PAM using a System Administrator account.
- Navigate to Administration > Discovery.
- Create a new Discovery query by clicking the Add Query button and then selecting the desired Query type as described in a previous section of this article.
-
Depending on the query selected, the following options may be available:
-
Name: (All) The name of the discovery query.
-
Filter: (Active Directory Query) Provides a method to filter endpoints based on the following values from AD: name, dnshostname, operatingsystem, operatingsystemservicepack
-
IP From: (IP-Range Query) The starting IP address for the range.
-
IP To: (IP-Range Query) The ending IP address for the range.
-
Use PowerShell: (IP-Range Query, CSV-Based Query) Check the box to enable the use of PowerShell for the scan (for Windows endpoints). Only PowerShell or SSH can be selected per query. If you would like to use both Protocols, then a second query must be created.
-
Use SSH: (IP-Range Query, CSV-Based Query) Check the box to enable the use of SSH for the scan (for Unix or Linux based endpoints). Only PowerShell or SSH can be selected per query. If you would like to use both Protocols, then a second query must be created.
-
Non-Standard Ports: (IP-Range Query, CSV-Based Query) Comma-separated list of non-standard ports to try during host discovery. If not specified the discovery process will attempt to connect to a remote host using port 22 for the SSH protocol and to the WS-Management port 5985 for the PowerShell protocol.
-
Discover Local Accounts: (All) Defines the type of user account to discover on the connected end-point. Discovered accounts could be either manually or automatically imported into the system as records. When imported, these accounts will be assigned a shadow record as a main host for future task executions. The following options are available:
-
All Accounts: Discovery will list all local accounts found on the end-point.
-
Privileged Accounts: Discovery will list only privileged accounts on the end-points. Privileged accounts in this context are those accounts in the local Administrators groups (Windows) and members of the sudo group (Unix). Unlike the All Accounts options, this list may include both local and domain accounts. These domain accounts will not be auto-imported to the vault.
Note that both the Windows and Unix scripts for All Accounts and Privileged Accounts discovery could be customized using the Scripts library.
-
-
Upload CSV: (CSV-Based Query) Upload the CSV file that contains the list of endpoints to be included in the scan. Click the Sample button to generate a CSV file that can be used as a template for proper formatting.
-
Accounts: (All) Enter the account(s) that will be used to attempt communication with the found endpoints. You may add one or more accounts for each discovery query.
-
Enable Auto-Import: (All) Check this box to enable the results of this query to be automatically imported and created as managed records. This applies to newly discovered hosts only.
-
Record Type for Auto-Import: (All) Select the Record Type that will be used when creating the auto-imported hosts. This record type will be applied to all auto-imported hosts.
-
Folder for Auto-Import: (All) Select the container where the hosts will be automatically imported into. If left empty, all discovered hosts will be imported into the System Root Folder.
-
Auto-Import Filter: The auto-import process will only import records that contain either the Windows Service or Service Account (Log On As or Run As…) that is selected by this provided filter.
-
Account Type for Auto-Import: (All) This parameter defines which account will be associated with the discovered record during the auto-import process. The following options are available:
-
Use connected account: Auto-import process will use the account successfully connected to the destination host during discovery process as an account on record.
-
Use referenced account: Auto-import process will use the specified referenced record as an account on record. Use this option when several discovered and imported records reference the same account.
-
Use provided account: Auto-import process will use the specified account as an account on record. Use this option to associate specific account with the newly imported records. Typically, a record type shadow account is used to set password for the imported record.
-
-
Reference Record for Auto-Import: (Use referenced account) Auto-import process will use the specified record as a referenced record for all imported records. Typically, this option is used when several imported records should reference the same account (such as Windows domain Administrator).
-
Account for Auto-Import: (Use provided account) Auto-import process will use the specified account as an account on record for all imported records (for example, Windows local Administrator). Typically, record type shadow account will be used to set password for the specified account upon record creation.
-
Record Type for Local Accounts: (All) This parameter defines a Record type for the records imported to the system from the discovered accounts when copying discovered account to the vault manually or using automatic import process. Discovered accounts refer to all or privileged accounts detected on the end-point after initial login in addition to the account used to discover the end-point. Leave this parameter blank to disable auto-importing of discovered account even when auto-importing the end-point host.
-
Filter for Local Accounts: (All) This parameter defines a regular expression filter for the discovered accounts when copying discovered account to the vault using automatic import process. Discovered accounts refer to all privileged accounts detected on the end-point after initial login in addition to the account used to discover the end-point. Filter example to auto import all local accounts started with Admin: ^Admin(.*). Leave this parameter blank to auto-import all discovered accounts.
-
Record Name Pattern: This optional parameter defines a name pattern for records imported from this Discovery Query. The following placeholders are supported:
- ${name} - Name
- ${host} - Host Name
- ${host.short} - Short Host Name
- ${account} - Account
- ${user} - Account without Domain
-
Auto-Import Name Check: (Active Directory query only) Check this box to enable the hostname verification check prior to auto-import. If the checks succeeds, the record will be imported; if the check fails, the record will not be imported and a message will be added to the report.
-
Enable Query: (All) Check this box to enable the query. Uncheck to disable the query.
-
Sample: (Active Directory Query, CSV-Based Query) Click the sample button to generate a sample configuration that can be used as a template for proper configuration.
-
Check the Enabled option to enable the query or leave it unchecked for it to remain disabled.
-
Click the Save button when finished.

For Amazon EC2 Queries, please see our Discovery for AWS article for configuration details.
Discovery Query Reports
How to review a Discovery Query report:
- Login to PAM using a System Administrator account.
- Navigate to Administration > Discovery.
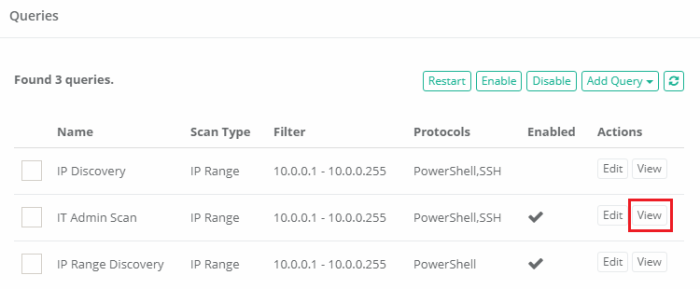
- Next to any Discovery Query that has already been completed, click the View button to open this query’s report.
-
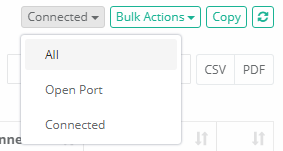
When the report loads, you the filter option along the top to choose your report view. The following options are available as a filter:

-
All: Displays all the endpoints that were found regardless of the response.
-
Open Port: Displays the endpoints that were found with an open port (PowerShell or SSH) regardless of the response.
-
Connected: Displays all the endpoints that were found and communication was successfully established using one of the Accounts provided in the Query.
-
-
Use the Search box to locate a specific endpoint and use the CSV or PDF options to export the results to a file.

Discovery Query Report Actions
The following information and actions can be taken from the Discovery Query Report.
- You can learn additional information about the endpoint by clicking its View button. This may provide information about the endpoint’s connection time, status, Operating System, Administrators group membership, custom Services and more.
-
Search to locate specific endpoints and export results to either a CSV or PDF file.
-
Sort report based on column headers to more easily organize and locate privileged endpoints.
-
Automatically create new managed records from Connected endpoints by selecting its row(s), clicking the Copy button and then Pasting it to an appropriate location in your System Records. Please note that the ability to create records from Discovered endpoints is only available when its Status is Connected.


Discovery Query Schedule
By default, Discovery Queries are configured to be run every 120 minutes.
New queries will be added to the job queue when saved; however existing queries that are edited will not be updated in the queue.
At any time, you may select a query or multiple queries and click the Restart button to add them to the queue for processing.
To update the default query schedule:
- Login to PAM using a System Administrator account.
- Navigate to Administration > Settings.
- On the Application Nodes tab, click on the node defined as the Worker to open its configuration.
-
Locate the option labeled Discovery and modify its value as needed. Value is based on minutes between scans.

-
Click the Save button when finished.
