Integration with Imprivata Enterprise Access Management (formerly OneSign)
Configuration for PAM and Imprivata EAM to provide SAML based authentication
PAM supports integration with Imprivata EAM using SAML protocol to defer user authentication to EAM.
The following guide describes how to configure your PAM and EAM integration.
Requirements
Before you begin your integration, be sure you meet the following pre-requisites:
- A working PAM deployment with the Federated Sign-In experience.
- Access to your existing PAM host server. You will need to update files and restart services.
- Access to your EAM portal to configure your authentication services.
- If Users are created and managed in EAM, then a matching user must also be created as an PAM Local User.
- If Users are synced from Active Directory to EAM, then you must also integrate PAM with the same Active Directory.
-
EAM must be provisioned with the Imprivata Cloud service before the integration can be performed.
Step 1: Begin the Imprivata EAM Configuration
- Login to your Imprivata EAM Admin portal.
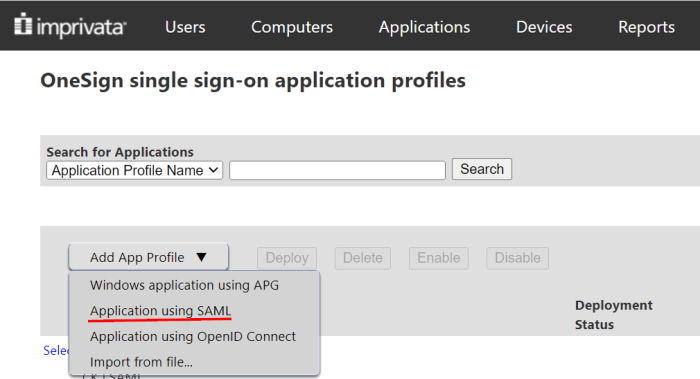
- Navigate to Applications > Single sign-on application profiles.
- Click on the Add App Profile dropdown and select the Application using SAML option.
Populate the Add application using SAML page using the guidance below:
Application profile name and Application user-friendly name – use any relevant value you choose. For example, PAM.
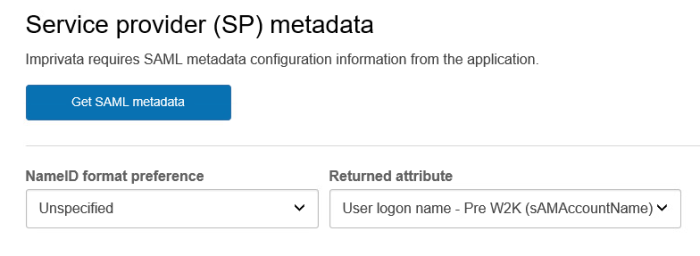
In the Service provider (SP) metadata section, assign the following selections:
NameID format preference:Unspecified
Returned Attribute:
Select User login name – Pre W2K (sAMAccountName) if PAM is configured to authenticate using sAMAccountName. This is the default configuration in PAM.
Select User login name (userPrincipalName) if PAM is configured to authenticate using UPN.
- In the Identity provider (IdP) metadata section, click to open the link named View and copy Imprivata (IdP) SAML metadata. When the link opens, locate and copy the URL displayed under the Metadata URL label. You will use this URL in the PAM configuration described in the next section of this guide.
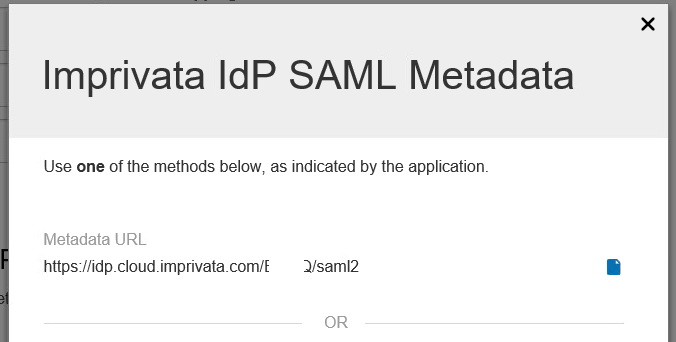
You may close this dialog, but do not logout of the Admin console yet. We will return to complete this configuration later in the guide.
If you are presented with a message that this application requires a secure connection to the Imprivata Cloud, then EAM has not yet been provisioned with this service. Please consult your EAM documentation or support engineer for assistance with this required step before continuing.
Step 2: Configuring PAM for EAM
- Login to your PAM host server and open the file $PAM_HOME\web\conf\catalina.properties in a text editor.
- Locate the section that is labelled # CAS and add the following new lines:
-
In the lines above, the following {placeholders} need to be updated using your own values explained here.
Save and close the file when you are finished.
-
cas.authn.pac4j.saml[0].keystorePassword={password} - Create an alphanumeric password. Any value you want to enter.
-
cas.authn.pac4j.saml[0].privateKeyPassword={password} - Create an alphanumeric password. Any value you want to enter.
-
cas.authn.pac4j.saml[0].serviceProviderEntityId={managed_path} - Replace this placeholder URL with your full https PAM login page URL ending with /xtam/, for example https://pam.company.com/xtam/.
-
cas.authn.pac4j.saml[0].serviceProviderMetadataPath={imprivatasso.xml} - The full path and file name of the imprivatasso.xml file that will be created after an PAM service restart later in this guide. For example, $PAM_HOME/content/keys/imprivatasso.xml (use forward slashes not backslashes). This file will be uploaded to your Imprivata SAML application later in this guide.
-
cas.authn.pac4j.saml[0].keystorePath={samlKeystoreImprivataSSO.jks} - Define a path and name for the PAM auto-generated key. For example, $PAM_HOME/content/keys/samlKeystoreImprivataSSO.jks (use forward slashes not backslashes).
-
cas.authn.pac4j.saml[0].identityProviderMetadataPath={path} - Enter the full URL copied from the Metadata URL section of your Imprivata SAML configuration. For example, https://idp.cloud.imprivata.com/{yourTenantID}/saml2.
-
cas.authn.pac4j.saml[0].maximumAuthenticationLifetime=2073600: This value defines a 24 day period (value in seconds) in which a user has generated a last authentication event in Azure Active Directory. This parameter helps if users begin experiencing login issues due to old authentication events.
Please note, if you made changes around SSO parameters to the $PAM_HOME/web/conf/catalina.properties file with the previously generated .xml and .jks files, you need to regenerate those files to apply the new changes.
-
-
When finished, save and close this file.
-
Restart the PamManagement (Windows) or pammanager (Linux) service.
-
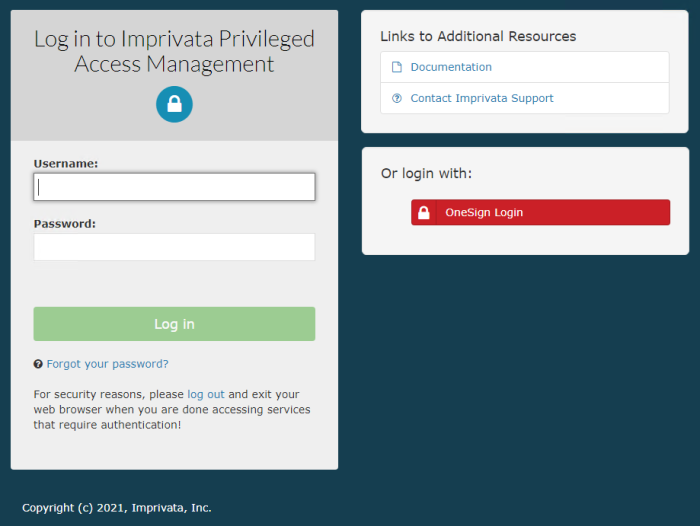
When the service is fully restarted, open your browser and navigate to the PAM login page. You should see a new red button with the EAM Login label.
# Imprivata  SSO SAML
cas.authn.pac4j.saml[0].clientName={login}
cas.authn.pac4j.saml[0].keystorePassword={password}
cas.authn.pac4j.saml[0].privateKeyPassword={password}
cas.authn.pac4j.saml[0].serviceProviderEntityId={managed_path}
cas.authn.pac4j.saml[0].serviceProviderMetadataPath={imprivatasso.xml}
cas.authn.pac4j.saml[0].keystorePath={samlKeystoreImprivataSSO.jks}
cas.authn.pac4j.saml[0].identityProviderMetadataPath={path}
cas.authn.pac4j.saml[0].maximumAuthenticationLifetime=2073600Step 3: Complete the EAM Configuration
- Return to the Add application using SAML page in your Imprivata Admin portal.
- In the section Service provider (SP) metadata click the button labelled Get SAML metadata.
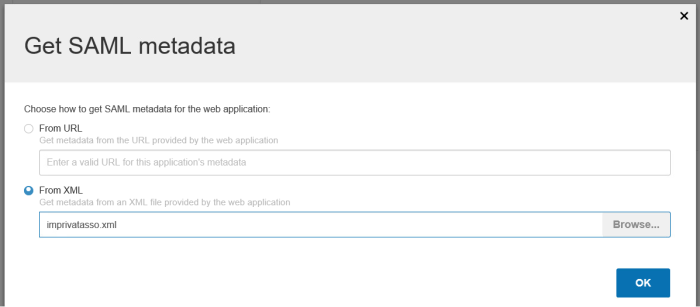
- On this Get SAML metadata dialog, select the From XML option and click the Browse… button.
- Browse to and select using the Open button, the imprivatasso.xml file that was created in the location defined in this previous PAM configuration parameter: cas.authn.pac4j.saml[0].serviceProviderMetadataPath={imprivatasso.xml}. For example, C:/pam/content/keys/imprivatasso.xml
- After the file is selected, click the OK button to complete.
-
Imprivata will process the .xml file and display the relevant information in the Service provider (SP) metadata section. Please review the metadata and confirm it is accurate.
-
When satisfied, click the Save button to complete the creation of this new application profile.
-
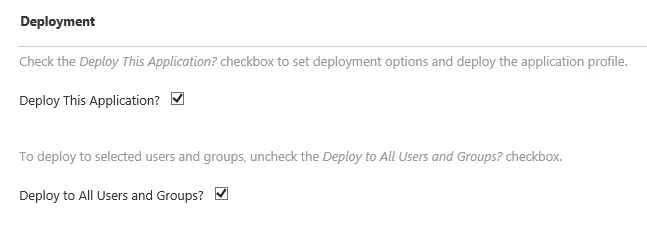
Finally, you need to Deploy this application and configure users. Click on the Not Deployed link next to your new application. On the Deploy application: PAM page:
-
Check the Deploy This Application checkbox
-
Check the Deploy to All User and Groups checkbox or use the other options available to deploy to specific domains, OUs, groups or users.
-
Click Save to complete the application deployment
-
-
Your new application will now be listed with the Deployment Status Deployed.


Step 4: Test your Login Integration
- Return back to the PAM login page and click the red EAM Login button.
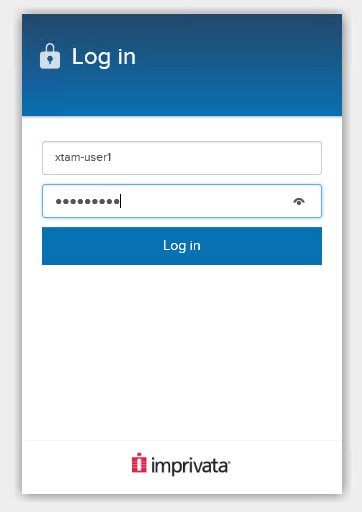
- You will be directed to the Imprivata login page. Enter credentials that are both valid in Imprivata for the PAM deployed application and valid with PAM. Click the Log in button to continue.
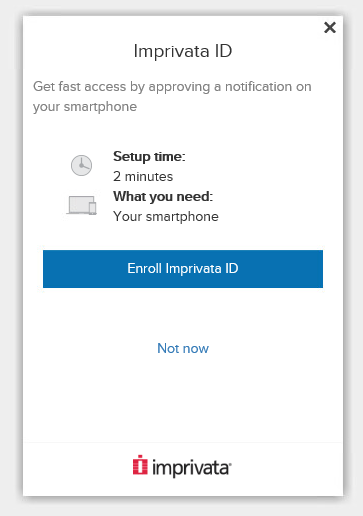
- (Optional) If Imprivata ID is available for your account, it may ask to authenticate with your Imprivata ID or you may be asked to enroll your device if you have not done so previously. Continue with Imprivata ID if required or choose the Not now option to do enrollment at a later date.
- After the SAML authentication is successful, your browser will redirect back into PAM. You have now successfully authenticated into PAM using Imprivata EAM.
To regenerate .xml and .jks files
-
On the PAM host computer, open the following file in a text editor $PAM_HOME/web/conf/catalina.properties locate the section labeled # CAS and specify the stated location for those files.
-
Remove or delete these previously generated .xml and .jks files from the location.
-
Restart PamManagement (Windows) / pammanager (Linux/Unix) service to regenerate those two .xml and .jks files, so your changes around SSO parameters can apply back to PAM.