Integration with PingIdentity SSO
This guide describes how to configure integration between PAM and PingIdentity to provide SAML authentication.
Requirements
Before you begin your integration, be sure you meet the following pre-requisites:
-
A working PAM deployment with the Federated Sign-In experience.
-
Access to your existing PAM host server. You will need to update files and restart services.
-
Access to your PingIdentity web portal to configure your authentication services.
-
An identical user must be created as a PAM Local User for every account that will login using PingIdentity.
Step 1: Configure your PingIdentity SAML Application for Integration
-
Login to your PingIdentity Web Console using an Administrator account.
-
Navigate to the Administrator's Environment.
-
Click on the Connections > Applications menu.
-
On the Applications page, click the + button to add a new application.
-
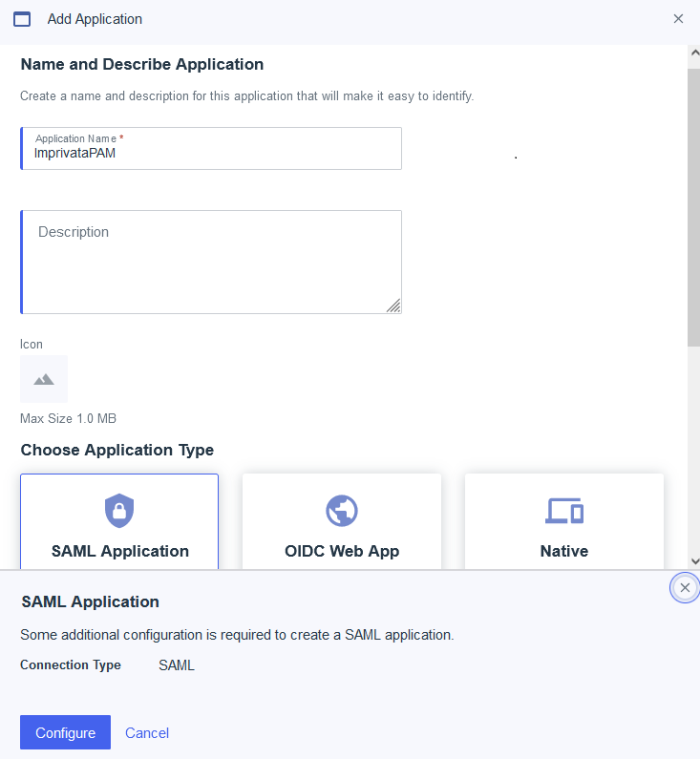
For this new Application, add a descriptive Application Name like Imprivata PAM.
-
For the Application Type, select SAML Application.
Finally, click the Configure button.
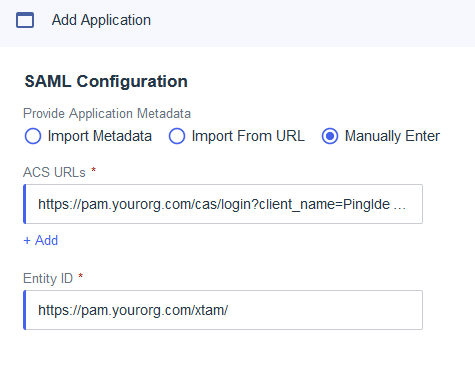
-
-
ACS URLs: https://pam.yourorg.com/cas/login?client_name=PingIdentitySSO
-
Entity ID: https://pam.yourorg.com/xtam/
-
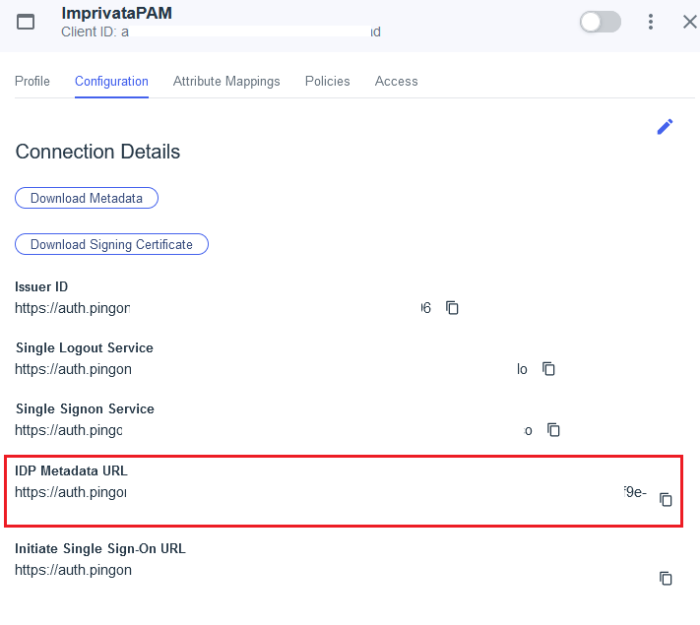
After it is saved, switch to the Configuration tab of this new Application and copy the value from the IDP Metadata URL to a temporary file. We will need this value in the next step.
-
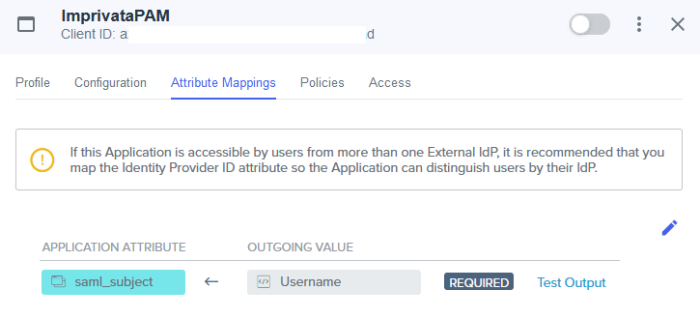
Switch to the Attribute Mappings tab and click the Edit button. On the Edit Attribute Mappings page, for the OUTGOING VALUE select Username from the dropdown menu. If PAM is configured for UPN, select the Email Address option instead. Click Save when complete.
-
Optionally, if MFA is required, switch to the Policies tab and click the Edit button. On the Edit Policies page, select the MFA policy to apply and click Save when complete.
-
Finally, use the UI control to Enable this application for use.
On the SAML Configuration page, choose the Manually Enter option and input your values as described here. Replace https://pam.yourorg.com in our examples with your PAM URL and click Save when complete.
Please note that each account’s Username or Email Address should exist in PAM as a valid user.

Step 2: Configure PAM for PingIdentity Integration
-
Login to the PAM host server and open the file $PAM_HOME/web/conf/catalina.properties in a text editor
-
In the lines referenced above, the {placeholders} should be updated to reflect your specific values as explained here. Save and close the file when you are finished.
-
cas.authn.pac4j.saml[0].keystorePassword={password} - Create an alphanumeric password. Any value you want to enter.
-
cas.authn.pac4j.saml[0].privateKeyPassword={password} - Create an alphanumeric password. Any value you want to enter.
-
cas.authn.pac4j.saml[0].serviceProviderEntityId=https://pam.yourorg.com/xtam/ - Replace this placeholder URL with your full https PAM login page URL ending with /xtam/.
-
cas.authn.pac4j.saml[0].serviceProviderMetadataPath={pingidentitysso.xml} - The full path and file name of the pingidentitysso.xml file that will be created after a PAM service restart later in this guide. For example, C:/pam/content/keys/pingidentity.xml (use forward slashes not backslashes).
-
cas.authn.pac4j.saml[0].keystorePath={samlKeystorePingIdentitySSO.jks} - Define a path and name for the PAM auto-generated key that will be created after a PAM service restart later in this guide. For example, C:/pam/content/keys/samlKeystorePingIdentitySSO.jks (use forward slashes not backslashes).
-
cas.authn.pac4j.saml[0].identityProviderMetadataPath={IDP Metadata URL from step 1} – This will be the full URL of the IDP Metadata URL from the PingIdentity Application temporarily saved to a file in the previous step. It will look similar to this example: https://auth.pingone.com/GUID/saml20/metadata/GUID
-
-
Restart the PAM service PamManagement (Windows) or pammanager (Linux).
-
After the restart is complete, navigate to the PAM login page. Confirm that both files, samlKeystorePingIdentitySSO.jks and pingidentitysso.xml, were created in the location you defined.
-
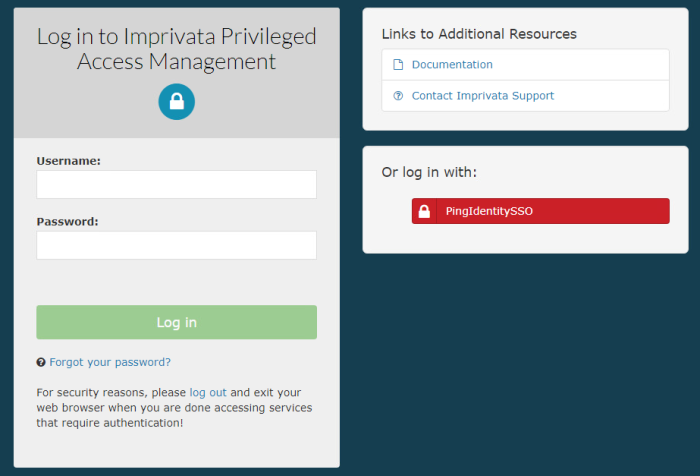
Now you can try your PingIdentity login by clicking the red PingIdentitySSO button on the PAM login page.
In this file, locate the section that begins with # CAS add the following new parameters:
# PingIdentity SSO SAML
cas.authn.pac4j.saml[0].clientName=PingIdentitySSO
cas.authn.pac4j.saml[0].keystorePassword={password}
cas.authn.pac4j.saml[0].privateKeyPassword={password}
cas.authn.pac4j.saml[0].serviceProviderEntityId={managed_path}
cas.authn.pac4j.saml[0].serviceProviderMetadataPath={pingidentitysso.xml}
cas.authn.pac4j.saml[0].keystorePath={samlKeystorePingIdentitySSO.jks}
cas.authn.pac4j.saml[0].identityProviderMetadataPath={IDP Metadata URL from step 1}
cas.authn.pac4j.saml[0].maximumAuthenticationLifetime=2073600
