Resetting Privileged Passwords
Creating records, securing access and establishing sessions is a great first step to securing your privileged accounts.
We are now going to take it one step further and introduce the concept of automated (or on demand) password resets.
This functionality takes security another step forward because it allows PAM to not only secure accounts but to also update their passwords in cases where events or triggers occurred.
In this section, we will configure and run an example of on demand password reset. Because we will be resetting an account password, it is highly recommended to use a test account for this exercise. If you do use an alternate test account, please be sure to update your “Production Web Server” record in PAM with this test account’s user and password.
To start and eventually validate the results, let’s establish a baseline use case.
-
Outside of PAM, open a standard Remote Desktop session and connect to the Windows host we have been using in our “Production Web Server” record.
-
When prompted, enter the user and password of your test account.
-
Ensure that Remote Desktop connects successfully.
-
Sign out and close Remote Desktop.
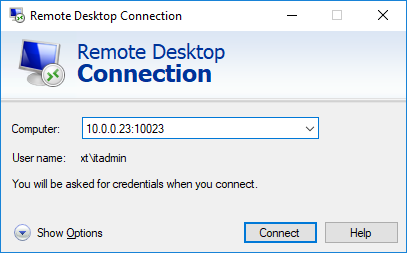
RDP Baseline Test Connection
Before we continue with the password reset exercise, we will take a few moments to examine the components that can be configured to execute this or other jobs in PAM.
Password Formulas
Formulas are configured to determine the strength and complexity of an automated or on demand password. It is here that you can configure password complexity to include such options as character length, include upper or lower case, numbers or special characters as well as history. To open and configure a formula:
-
Open the IT Records folder by clicking on the folder name in the list or by using the folder dropdown or Action menu and selecting Open.
-
If you still have it in your Favorites, then you can click <IT Records> in your left navigation menu for quick access to this folder.
-
-
Open the Production Web Server record by clicking on the record name or by using the record dropdown or Action menu and selecting View.
-
Locate and click the Manage >Formula button along the bottom of the record view.
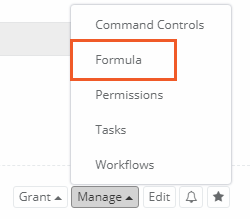
Formula Button
-
The Password Formula page will load and display the default configuration. It is here where changes to this configuration can be made, but first we must decide if we want to change the inherited Formula (default) or to make it unique to this object and then change it as needed.
-
To learn more about inheritance throughout PAM, please read about Inheritance.
-
-
For this exercise, we are going to make this Formula unique to this record. Continue by clicking the Make Unique button and then accepting the message that appears. The Formula will refresh and it is now unique to this record only.
-
Now we can change the Formula without it affecting any other records in the system.
-
Change the following settings or create your own:
-
Minimum Password Length: 25
-
Maximum Password Length: 30
-
-
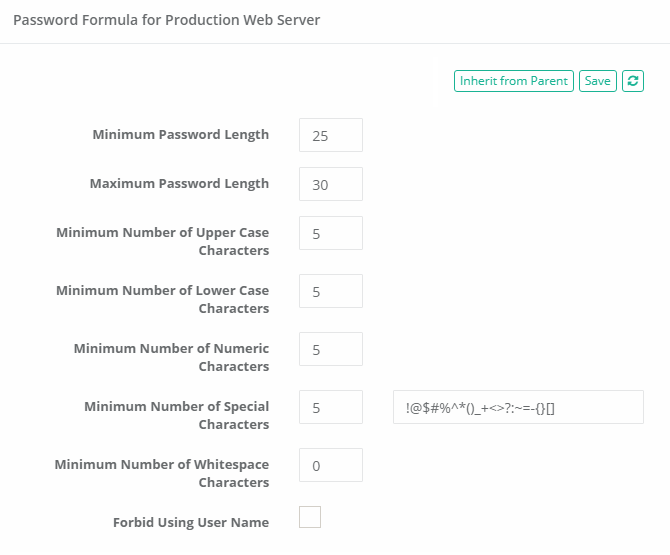
Creating a Unique Formula
-
Click Save.
-
Click your browser’s Back button to return to the record.
The Formula is customized and has been saved to this record only (made unique).
Record Tasks
A Record’s Task consists of two elements, a Script and a Policy.
The Script component is what will be executed against the record (password reset or custom written) and the Policy is when it will be executed. In our example, we will be executing the default “out of the box” Password Reset script for our Windows Host record type.
Since this task is already available for our Windows Host record type (via inheritance), we do not have to make any changes, we can simply proceed to the next component in our Task which is the Policy.
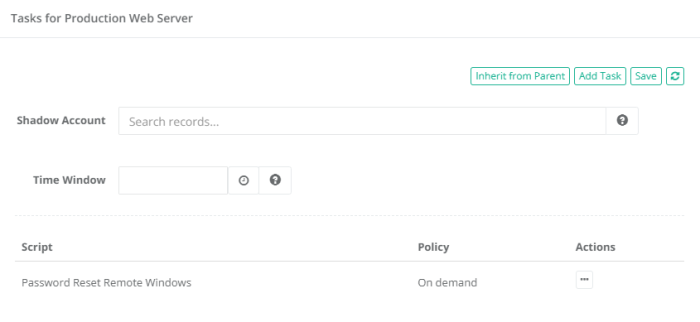
Record Task View
Record Policies
The next area of job execution is the schedule or trigger that causes the script execution which are called Policies.
This can be associated to specific events detected on a record like an edit operation, it could be a trigger on a specific day or it can be configured as an “on demand” action.
To access the Policies:
-
Open the IT Records folder by clicking on the folder name in the list or by using the folder dropdown or Action menu and selecting Open.
-
If you still have it in your Favorites, then you can click <IT Records> in your left navigation menu for quick access to this folder.
-
-
Open the Production Web Server record by clicking on the record name or by using the record dropdown or Action menu and selecting View.
-
Locate and click the Manage >Tasks button along the bottom of the record view.
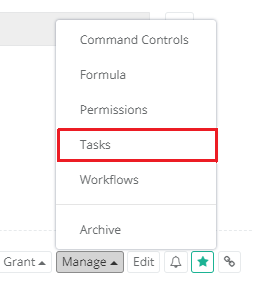
Tasks Button
-
The Tasks page will load and display the default configuration. It is here where changes to this configuration can be made, but first we must decide if we want to change the inherited Policy or to make it unique to this object and then change it as needed.
-
To learn more about inheritance throughout PAM, please review What is Inheritance? article.
-
-
For this exercise, we will be executing the Password Reset Task using the Policy “On demand” and because the inherited default policy already includes this option we will not be making it unique like we did with the Formula. However, if you want to experiment with a unique Policy, click Make Unique and customize as needed by using the Edit Policy option located in the Actions menu. To continue along with this exercise, be sure “On demand” is enabled and the Task is saved.
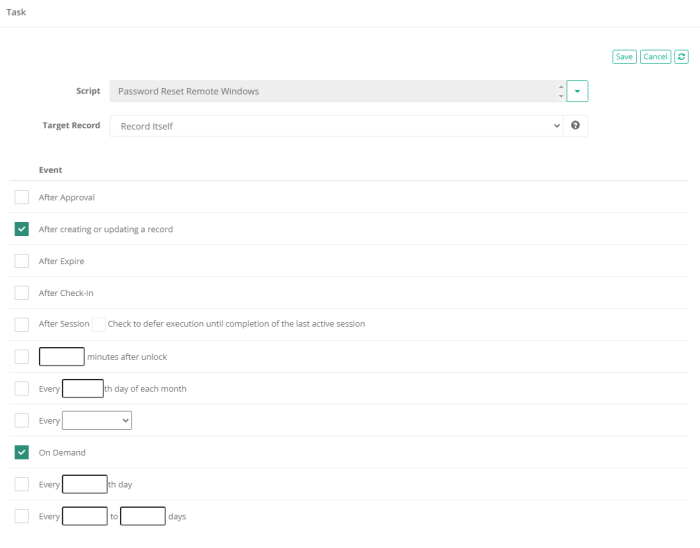
Unique Policy on Task
-
Click your browser’s Back button to return to the record.
Our task already included the On Demand policy option, so we are going to continue without making any changes to it.
Password Resetting
We have configured our basic password reset job (more complex formula and on demand policy in our task), so our next step is to run it. To run this password reset job:
-
Open the IT Records folder by clicking on the folder name in the list or by using the folder dropdown or Action menu and selecting Open.
-
If you still have it in your Favorites, then you can click <IT Records> in your left navigation menu for quick access to this folder.
-
-
Open the Production Web Server record by clicking on the record name or by using the record dropdown or Action menu and selecting View.
-
Locate and click the Execute button along the top of the record view and then select our Password Reset task.

Execute Password Reset
-
The Schedule Job page will now display. Before we continue, let’s look at the information and options on this page.
-
Along the top, an automatically generated password will appear in the Password field that satisfies the formula we defined earlier. If you were to continue now, the password displayed in this field will become the new password for the account associated to this record when the reset job completes.
-
You can click the Generate button to its right to cycle through randomly generated passwords that also satisfy the formula.
-
You can also manually type in a password if you prefer but it must satisfy the formula rules before you can continue. Use the Validate button to ensure your password meets these requirements and adjust as necessary.
-
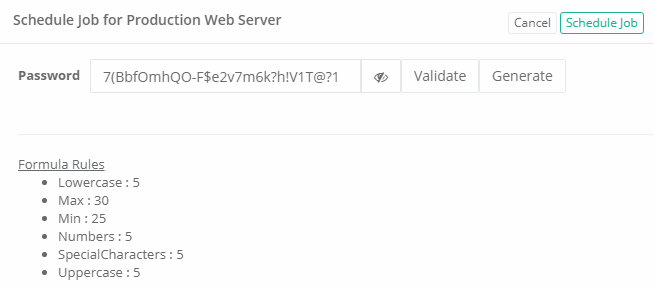
Password Generation
-
When you are happy with the password, click Schedule Job to execute the reset.
-
On demand jobs like this will be immediately added to the Job Queue and processed based on availability and PAM’s queue. In this newly installed system, this job should begin processing almost immediately.
-
-
The system will navigate you back to the record’s View page. The Job Queue field will show that the job has been generated and set to process.

Record's Job Queue
-
Locate and click the Job History button. It will be in this view where you can view information about any currently running or scheduled jobs associated to this record.

Job History Button
-
You will see our “On Demand” job displayed with a specific state. Navigate around the page to explore the options that are available for Job History and after a minute or two, click Refresh.
-
When the job completes, the State will be shown as “Completed”.
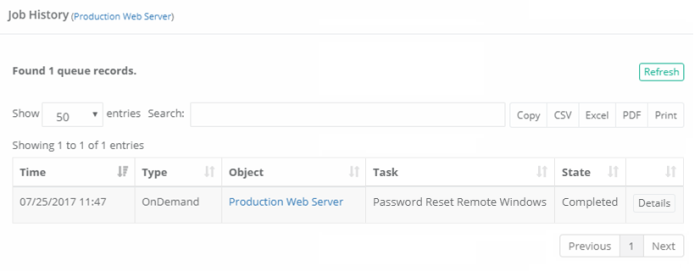
Job History Completed
The password reset job is now complete, but we need to validate our results before we continue.
To do this, let’s repeat our baseline test from the beginning of this section.
Outside of PAM, open your Remote Desktop session and attempt to connect using the original test account’s user and password.
Now, unlike earlier, you should fail to connect because either the username or password is wrong. We know it is the password because we just changed it.
At this point in the exercise, we have totally secured this connection.
The only way to connect to this host is by using a secure privileged session in PAM because the password to the account is not known to anyone besides the system.
With that stated, there are very valid reasons when the password must be shown or shared between users, so you are still able to expose (unlock) it when needed.
The process is quite simple and we demonstrate that now.
Password Unlocking
Unlocking a password is the act of exposing a password to the user of PAM.
A couple of points to highlight before we begin the exercise:
-
The user must be granted the appropriate permission to unlock a password. Permissions will be discussed in the next section.
-
Secured passwords are never stored on any client computer. Passwords remain secured in the database of secrets until and only when they are required. In this example, the user requests an unlock and it is delivered to their browser where it is stored temporarily for this browser session only.
-
All password Lock and Unlock events are captured in PAM’s Audit Log.
Now let’s try out a password unlock. Using our recently password reset “Production Web Server” record as our example, to unlock a password:
-
Open the IT Records folder by clicking on the folder name in the list or by using the folder dropdown or Action menu and selecting Open.
-
If you still have it in your Favorites, then you can click <IT Records> in your left navigation menu for quick access to this folder.
-
-
Open the Production Web Server record by clicking on the record name or by using the record dropdown or Action menu and selecting View.
-
Locate the Password field. To its right, click the Unlock button.

Password Locked

Password Unlocked
-
Once Unlocked, you can click the Show button to display the password in the field or click the Copy button to copy the password to your clipboard.
- After unlocking with the Show button, NATO Phonetic Alphabet appears to show the password for transmitting over the phone or retyping the password to the other location.
-
The password is requested by the client and is delivered to your web session from the secured database of secrets.
-
Observe that it is no longer the password that we used in our baseline Remote Desktop test and that it validates against the unique Formula rule we created in the previous exercise.
-
- You can click the Unlock button again or refresh your browser to return this field to its default Locked state.
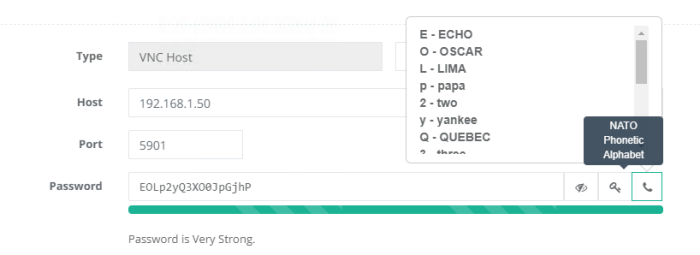
NATO Phonetic Alphabet for Password
And there it is. A fully automated (on demand) password reset job to a complexity (formula) you defined and secured in such a manner that most users will only be able to connect to the host using a secure, recorded session in PAM.