Configure Web Form Input Fields
Much like everything else on the internet, input fields on web login forms can be and are often different.
Some developers use common IDs like “username”, “user”, “email” or “password” to define the input field on forms while others use more exotic naming conventions.
Regardless of what is used for your particular input field IDs, the extension attempts to auto-detect as many as possible; however, sometimes it needs to be told the ID explicitly.
The PAM browser extension is looking for the form input fields that contain the following as a part of its ID, Name or Placeholder attribute to identify the field as a user field: Username, User name, email, user, login, identifier. In addition, the input field with email type is considered a user field.
Password fields are identified as input fields of a password type.
If the extension is not populating your username or password field properly, please perform the following procedure.
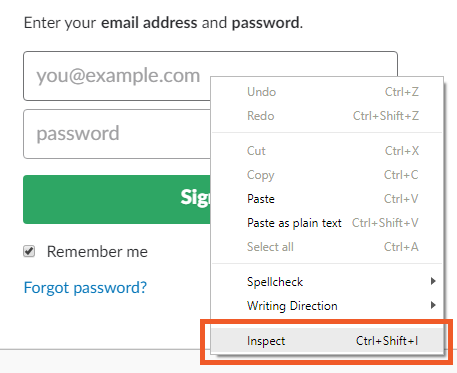
- Open your the web page that contains your form, right click on the input field that is not populating and select the Inspect or Inspect Element option. If you are using Microsoft Edge, you will need to first open the Developer Tools (F12 key).
-
The Developer view of your browser will now open and detail the various elements associated with your selected input field. From here, locate and copy the value defined in the “id” element of your input.

-
Now, log in to PAM server as a System Administrator and open the server parameters (Administration > Settings > Parameters).
-
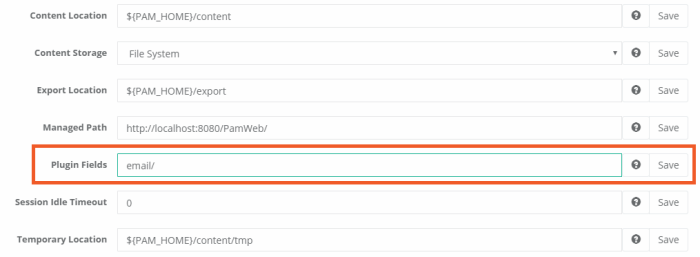
In the Plugin Fields input field, paste the value copied from step 2 and click Save.

Please note the format of this value is customUserID/customPasswordID. For example, if you need to enter only a custom ID for the username field, simply enter the value followed by a slash (/). If you need to enter both a username and password field ID, then enter both with a slash (/) between them.
-
Return to the browser and either open/close the extension or click the Refresh button along the bottom and try again. If it is still not working as expected, please contact our Support Team https://support.imprivata.com/ for assistance.
