Preventing Users Access to PAM or its Objects (Deny Login and Block Access)
PAM offers several options for a System Administrator to control a user’s (or group) access to the software or the objects managed within it. Depending on the circumstances needed, here are methods that can be employed to manage access to PAM.
Deny Login of a User or Group
When a user or group is denied login to PAM, they are unable to successfully authenticate into PAM.
This prevents a Deny Login user from authenticating into PAM by any means including the PAM web console, remote web sessions, proxy sessions and API access.
The Deny Login feature can also be useful if you are configuring PAM access to only specific users or groups.
This is done by applying the Deny Login option as the Default state for all users and then allowing for exceptions to these users or groups for which you wish to allow PAM authentication.
Deny Login Required Configuration
The following procedure is required to enable the Deny Login option.
Before you begin, please review, and perform the steps outlined in this section.
-
Login to PAM with a System Administrator account and confirm the Federated Sign-in Module version by navigating to Management > About. On this About page, find the parameter Authentication and confirm the version is 5.2.8.20221013 or later (Authentication: CAS 5.2.8.20221013). If the displayed Authentication version is earlier or does not display a version number, then you must first update this component using this guide before continuing: Updating the Federated Sign-in Module.
-
Login to the PAM host server and open the file $PAM_HOME/web/conf/catalina.properties in a text editor. Elevated permissions may be needed to change or save this file.
-
In this file, use search to confirm or update so that the following parameter is commented out (put a # character before the line). This parameter may appear several times in this file, and each should be commented out:
-
In this file, use search to confirm or update so that the following line is uncommented (remove the # character before the line):
-
In this file, use search to find and uncomment the below parameter if it already exists (remove the # character before the line) or if not found, add it as a new line:
-
When complete, save and close this file.
-
Restart the PamManagement/pammanager service.
cas.authn.mfa.globalProviderId=mfa-If one of these globalProviderId parameters is currently uncommented, then your PAM is configured to use that uncommented MFA provider as its global default. In this configuration, deny login cannot be used, you should stop and contact our Support Team https://support.imprivata.com/ for further help.
cas.authn.mfa.groovyScript=[path/to/file/xtam-mfa.groovy]The exact file path after the equal sign will differ between PAM deployments depending on the underlying operation system (Linux vs Windows) as well as the location where PAM was installed on the host server. Simply uncomment this line and do not modify the existing file path after the equal sign.
cas.authn.mfa.u2f.name=mfa-u2f Deny Login to a Specific Users or Groups
A System Administrator can apply the Deny Login feature to a User or Group using the MFA configuration page in PAM.
-
Navigate to Administration > MFA and click the Add button.
-
For the Principals option, click Add and then add the User(s) or Group(s) that you wish to apply to the Deny Login policy. Click Select when complete.
-
Next, from the Provider dropdown menu, choose the deny login choice.
-
Finally, click the Save button to finish this configuration.
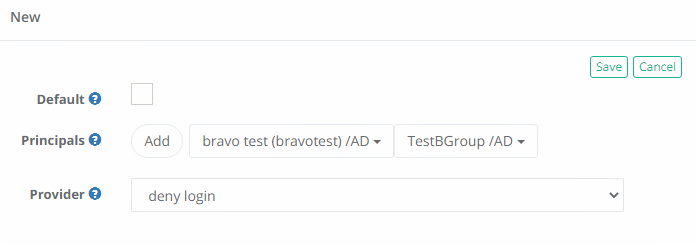
Only one MFA provider may be applied to a principal. If the principal already has a policy applied, you will need to remove the current provider and apply the Deny Login policy for this feature.
Deny Login to Everyone with Allowed Exceptions
To configure PAM to only allow authentications from selected users or groups, you can use the Deny Login default state.
The Deny Login policy as the default state will deny login to all valid logins except for the allowed exceptions that have been configured.
The following configuration will provide an example of how Deny Login can be used to allow only specific Principals to authenticate into PAM.
Only one Provider may be assigned the Default state. If another provider is using the Default state, then please consider how best to configure Deny Login with your existing MFA providers to meet your requirements.
The example requirement is to allow only the local System Administrator, one Domain user account and one Domain Group to login to PAM with MFA enforcement. We will start the example assuming there are no current MFA configurations (i.e., Administrators > MFA is empty).
Navigate to Administration > MFA and click the Add button.
For the Principals option, click Add and then add the User(s) or Group(s) that you wish to not include to the Deny Login policy. In our example, this will be the local System Administrator, our one Domain User Account and our one Domain Group. Click Select when complete.
Next, from the Provider dropdown menu, select the none choice. You may also select a different MFA provider, but for testing we recommend using none until you are comfortable with this process.
Click the Save button to finish this configuration.
Click the Add button again to create another new MFA policy. For this next policy, click the Default checkbox and select the deny login option from the Provider dropdown menu.
Click the Save button to finish this added configuration. Our completed example configuration is shown below.

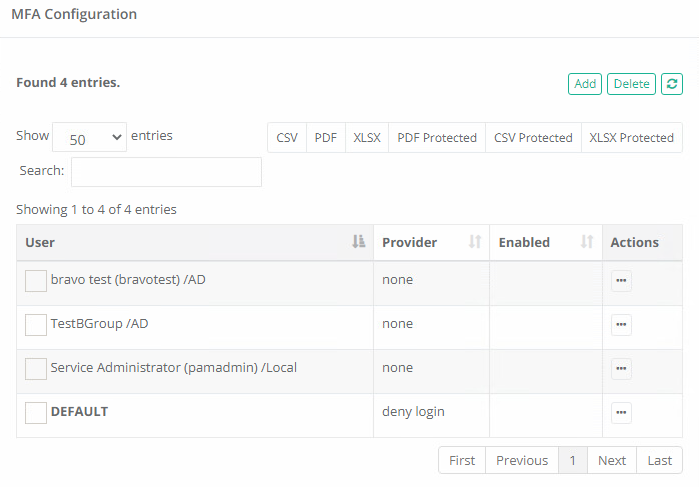
To test this configuration, first login to PAM using one of the allowed user accounts.
The expected experience for this account is that they should successfully login to PAM.
If you configured a provider other than none, you would be expected to supply your MFA requirement prior to successful login to PAM.
Next, login with any other valid user account that is not one of our allowed accounts.
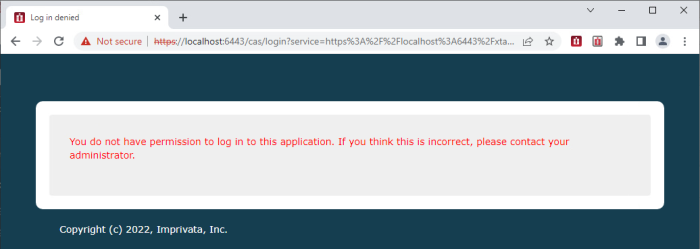
After this user successfully authenticates their credentials to PAM, they will be denied login to the software.
Customizing the Deny Login Message
When a Deny Login user attempts to login to the PAM web console, they are presented with a page that displays a message saying that their login does not have permission to access this application. On this page, both the Page Title text and Message Body text can be customized.
To change this text, login to the PAM server and perform the following procedure:
Open the $PAM_HOME/web/webapps/cas/WEB-INF/classes/custom_messsages.properties file in a text editor.
Locate the two parameters pam.mfa.deny.pagetitle and pam.mfa.deny.message
Update the text of one or both parameters and save the file when finished.
A service restart is not needed, but it may take several minutes before the updated message appears to the users. Wait a few minutes and retest a Deny Login account to confirm the customized message is now visible.
Blocked Users or Groups
To remove a user’s access to objects and settings within PAM, a System Administrator can apply the Blocked role to their account. When a user is blocked, they may still log in to PAM, but their access to objects stored in the vault is no longer available until they have been unblocked or this role is removed.
This can be a useful method if a System Administrator wants to easily remove a user’s access to PAM objects without making changes to the permissions on objects. Conversely, a user can be unblocked or have the blocked role removed from their account to quickly restore their access to PAM objects.
To Block a User or Group
A System Administrator can block a user directly from the Users Report:
Navigate to Records > Report Center > Users Report and find the user that you wish to block.
From this user’s Actions menu (…) select the Block User option and click OK on the confirmation dialog.
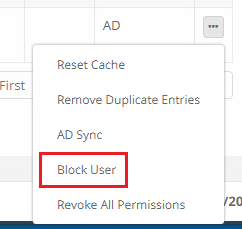
After the selected user has been blocked, you will notice that their Username in the Users Report is now crossed out showing this account is blocked. Additionally, you will see the Blocked role has been applied to the account in the report’s Global Role column.

To unblock this user, from their Actions menu (…) select the Unblock User option and click OK on the confirmation dialog. After unblocking, the crossed-out font on the Username and the Global Role Blocked will be removed from this account.
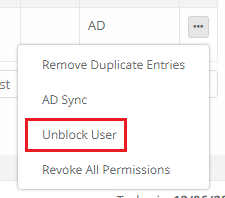
A System Administrator may also block a user from the Global Roles page:
Navigate to Administration > Global Roles and click the Add button.
Add the user you wish to block to the Principal field and then select the Global Role Blocked from the dropdown menu.
Click the Select button to complete the operation.
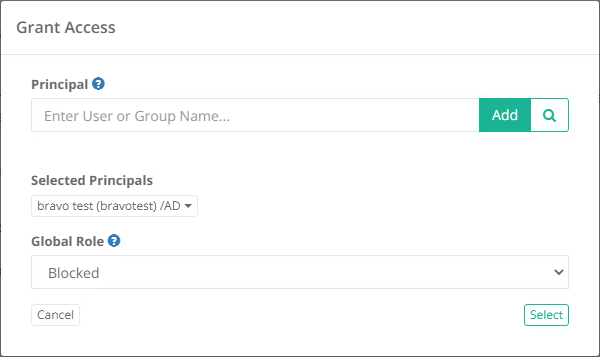
After the selected user has been blocked, you will notice that their account is now visible in the Global Role list with the Blocked role applied. Their account will also be crossed out and have the Blocked role if you also find it in the Users Report.
To unblock this user, select this user by clicking on the checkbox on their Blocked row and click the Remove button. This will remove the Blocked role from the account and the user will be unblocked.
