Proximity Groups
Privileged Access Management (PAM) can be configured with multiple session manager modules and proximity groups that are used to determine which Session Manager is used to serve each remote endpoint(s).
Proximity groups can use an IP range (i.e. 10.1.1.x/24) or Host Mask (in RegEx form i.e. (.*)\.contoso\.com) or Vault Name in order to determine where the session communication is sent.
For additional information about why you may consider deploying multiple session managers, please read our blog post on this topic here: Deployment Architecture to Scale Session Manager.
Once you have two or more Session Manager modules deployed, you will then need to create your proximity groups. For example, computers from the network 10.0.0.x/24 will be served by Proximity Group A while computers from the network 10.1.1.x/24 will be served by Proximity Group B.
- Login to PAM as a System Administrator.
- Navigate to Administration > Settings > Proximity Groups.
- Click the Add Group button.
- Enter a Group Name to easily identify this Proximity Group.
- Choose the Selector, either IP Range, Host Mask, Vault Based, Folder Based or Composite.
- Click the Add Server button.
Enter the Host Name where this remote Session Manager module resides.
Enter the Port value of 4822 (default) or the value that was configured.
-
Click the Create button to save this group.
-
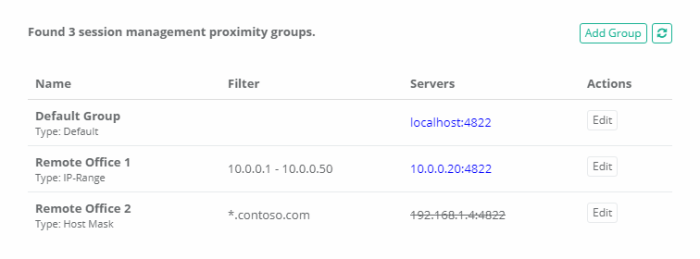
Once saved, the Proximity Group will be created and PAM will automatically check its connectivity. If the communication channel is successfully established, the Servers value will be displayed in blue, if it is successful and secured it will be displayed in green and if it failed to connect it will be crossed-out. Your Proximity Group is working when either blue or green, crossed-out will need to be resolved.
-
You can repeat this process as many times as needed to configure additional Proximity Groups.

Note that you can add multiple session manager servers to a Proximity Group in order to enable PAM load balancing.
Ensure that port 4822 is open between PAM and your remote session manager server.
Disabling Proximity Groups
Disabling Proximity Groups or Session Manager Servers is available to help block the service of a session manager to be in use.
The need to Disable a Proximity Group or Server would be to perform maintenance, troubleshoot, or update the Session Manager components.
Disabling it can ensure no traffic or load will be placed on the session manager, disallowing sessions to connect.
Disabling a Proximity Group will continue to support any existing active sessions but will not have the ability to create new sessions until it is enabled again.
To Disable a Proximity Group
-
Go to Administration > Setting > Proximity Groups and select the Edit action for the according proximity group you wish to disable.
-
Uncheck the Enabled checkbox section and Save the Proximity Group.
-
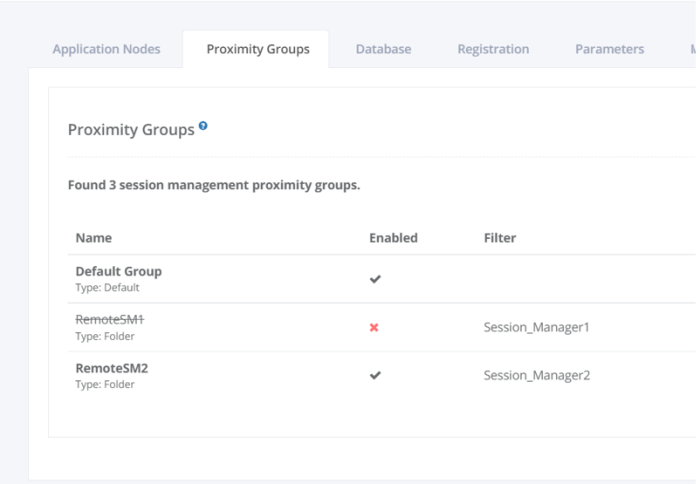
The disabled Proximity Group will have a strike through font in its name, as well as a X to indicate it is disabled.

Example scenario with two Proximity groups
One of them being the Default Group (Local Session Manager) and the other being a new Proximity Group (Remote Session Manager):
-
If PAM was installed on the master computer with session manager as a selected option during installation, by default a Proximity Group named Default Group will be set up post installation.
-
If this is enabled (it will by default) and another Proximity Group is disabled, any new sessions within the disabled proximity group will automatically be supported by the local PAM (master computer) session manager.
-
If a connection issue occurs trying to connect to a session, it could be because of a Proximity Group being disabled.
Navigate to the Audit Log report to verify the connection error being linked to an inactive session manager.
Please double check your Proximity Group configurations to confirm and reconfigure if needed.
Below is an example:

To Enable a proximity group, edit a disabled proximity group and select the Enabled checkbox, then save the proximity group.
The strike through font will disappear and a checkmark will indicate it is enabled.
An enabled proximity group will continue supporting existing active sessions and will accept new ones too.
Disabling Servers
Within Proximity groups you may have multiple Servers supporting sessions.
At any given time, a server may require maintenance, troubleshooting, or updating of the Session Manager components.
Disabling a server (or multiple servers) can be a valid option in this case to bring one server offline while keeping others in the same Proximity Group online.
To Disable a Server within a Proximity Group
-
Go to Administration > Setting > Proximity Groups and select the Edit action for the according proximity group you wish to disable the server within.
-
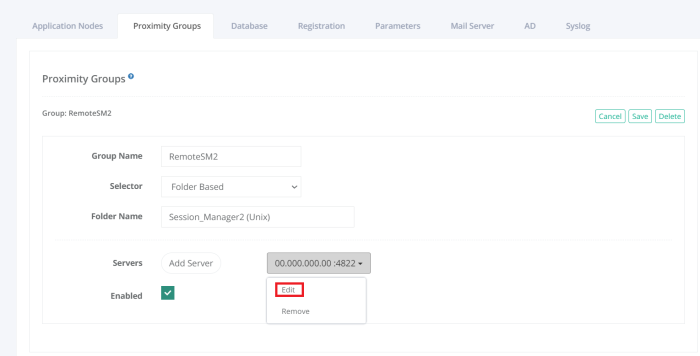
Click on the Server you wish to disable, a dropdown will appear and select Edit.
-
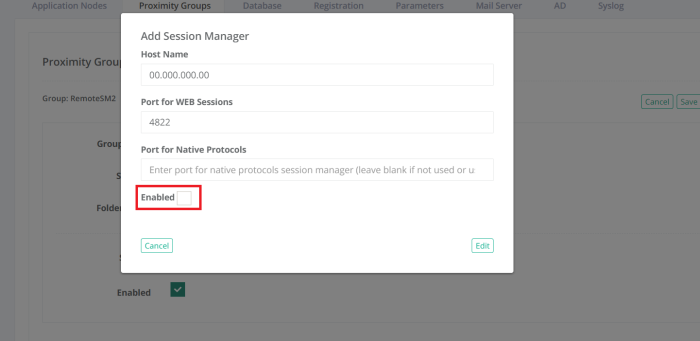
Uncheck the Enabled checkbox and save. Save the proximity group as well, and confirm the server is disabled with a strike through font used for its Host Name.


Please note if the Port Number of a Server is struck out, as opposed to its Host Name, that indicates the Server is enabled, but connectivity to it using this defined port was not successful. Check and fix your network connectivity between the PAM Node and the Remote Server using this port to reestablish the connection.
If there is slowness when loading the Proximity Groups page, it could be that there are a large number of proximity groups configured. In such cases, please add the following property "xtam.api.config.check_groups.threads_per_request=10" to catlina.properties and set a value > 5.
Restart Pam manager and verify performance. The default value for this property is 5.