Check Out Option
The Check Out feature enforces accountability on records by only permitting a single user to access the record while in the checked out state.
Combining the Check Out function with a password reset policy extends this feature to include a One Time Password scenario, where the password is automatically queued for rotation when the Check In action is executed.
The user who checks out the record will have the ability to use this object for the time that they have requested or they may checkin the record when they are complete.
Record Owners and System Administrators may force a checkin to immediately release the record in the case where emergency access is required or simply because the requester forgot or is unavailable.
This article will cover the following areas of interest:
1. How to Configure the Check Out Feature
2. How to Configure Check Out with a Password Reset Policy to create One Time Passwords
3. The User Experience of the Check Out Feature (checkout and checkin)
In this article, we will continue using the My First Workflow example that was created in our Getting Started Guide: System Approval Workflows. If you have not already, review that guide to become familiar with PAM workflows or if you already have one in your System instance, you may use that instead.
Configuring the Check Out Feature
How to configure the check out feature:
- Login to the System as a System Administrator.
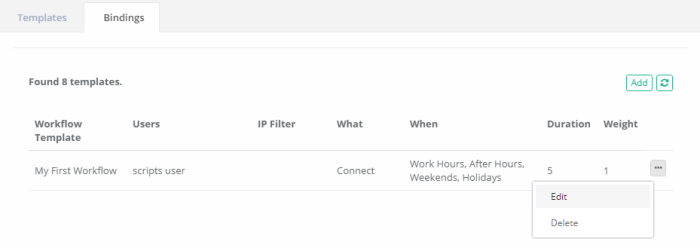
- Navigate to Administration > Workflows > Bindings.
- Locate the Binding that is associated to the template My First Workflow and choose its Edit option.
-
On the Binding page, scroll down and locate the Checkout option. Select one of the following states:

-
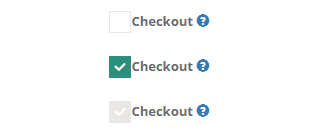
Disabled: The record will not be Checked Out. The option will be set to not Check Out the record and the requester cannot change this setting.
-
Optional: The requester will decide whether or not to Check Out the record when making the access request.
-
Required: The record will be Checked Out. The option will be set to Check Out the record and the requester cannot change this setting.
-
-
Click the Save button when complete.

This binding now has your selected Checkout state applied.
Configuring Check Out with a Password Reset Policy
To configure check out with a password reset policy to create one time passwords:
- Navigate to the record where you want to implement the One Time Password feature.
- On this record, choose the Manage > Tasks option.
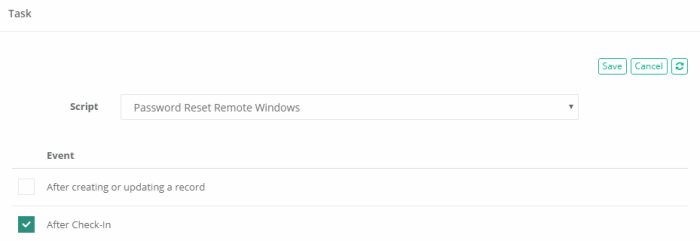
- Select the Task Password Reset Remote Windows and choose Edit Policy in the Actions menu.
- Locate and check the option After Check-In.
-
Click the Save button when complete.
To learn more about how Tasks are configured, including with Record Type inheritance, please review this article Task Configuration and Execution

Now whenever the record is Checked in, this Password Reset task will be automatically queued for rotation by the system.
You should also include the After Expire policy event. This will include the scenario where the user does not check in the record and instead the approved time period expires. After this expiration, the password reset policy will then be triggered.
The User Experience of the Check Out Feature
Let’s now walk through how a user interacts with the Check Out feature, including Check In.
- Login to the System with the user account that is applied to this workflow binding.
- Navigate to this record and click the Request Connect option.
- The Request Access dialog will appear. Fill out it as needed and take note of the Checkout option towards the bottom. Depending on how you configured the binding, it will appear in one of these states:
-
Click the Request button to submit your request
-
Using your System Administrator account, approve this user’s request.
-
Once approved, the record will be automatically checked out to this user now or when the requested time begins. Take note that the record now displays who it is Checked Out to and the time for when it will be automatically checked back in.

-
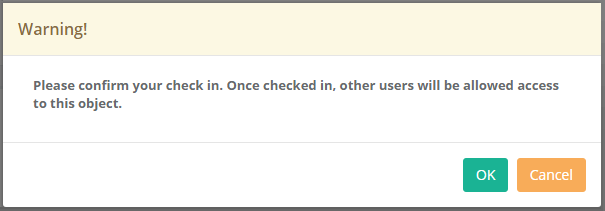
At this point, you may use this record until the requested time expires or click the Checkin button to complete the request immediately. Regardless of your option, once the record is checked in, you will need to request access again to continue working.

-
Optionally, while the record is checked out, navigate to it with the System Administrator account to see how the record appears for other users. The action options, Connect, Execute, Edit and Grant are removed while checked out to another user; however the record Owner or System Administrator will have access to the Checkin button as well. At any time, they may override the check out and force the checkin of this record which will return the record to its default Checked In state and therefore would require this user to request access again.

To be clear, any users with at least Viewer will be able to see who the record is checked out to and when it will expire, but only record Owners or System Administrators will have the option to force the checkin on another user.