Windows Local Admin Group Cleanup
Any user who are members of a Windows local Administrators group have elevated permissions on this computer, including the ability to install programs, change IP addresses and potentially cause havoc within your business, and because of this it is crucial for Network, Domain and Security Administrators to be able to easily monitor and manage this group’s membership across all Windows endpoints. In a nutshell, users should not have unnecessary administrative privileges; this is bad practice.
If you simply want to report on local Administrators group membership (or any group for that matter), this can be accomplished quite simply with an XTAM task. And if you want to go one step further and cleanup the group’s membership (remove all users except those specified), that too can be easily accomplished. In this FAQ article, we are going to detail the process for cleaning up the Administrator group’s membership.
Before we begin, it’s important to understand the ramifications to this action. Cleaning up Windows local Administrators group membership is good and highly recommended, it may come as a surprise to those users who are “cleaned”. Things and tasks that they could do yesterday may no longer be possible, so if necessary run reports first so you can alert your “cleaned” users ahead of time to minimize their potential objections.
When you are ready to begin, perform this procedure in XTAM. We recommend running this on a few Windows test hosts before you run it against all your managed Windows endpoints.
- Create a new or use an existing Windows Host record.
- Open the record’s Task menu by selecting Manage > Tasks.
- Add the Task Windows Local Administrators Group Cleanup to this record by using one of these two procedures:
Add the Task directly to the record’s Record Type and allow inheritance to apply it to this record.
Make this record’s Task unique by clicking the Make Unique button and adding the task directly to this record.
-
Once the task is applied, configure the task’s Policy to include the On Demand execution. In this example, we are going to manually execute the reset, however you can configure any additional policies including automated reset as you need.
-
If the user already associated to this record is not also a member of the host’s local Administrator’s group, then you will need to add a Shadow Account to the task that contains a user account that is a member.
-
Click the Save button.
-
Return to the record, active the Execute dropdown and select our Windows Local Administrators Group Cleanup task.

-
When the task executes, open the Job History tab and check the state. When the State is Complete, open the Details to review all users that were removed from this host’s local Administrators group.
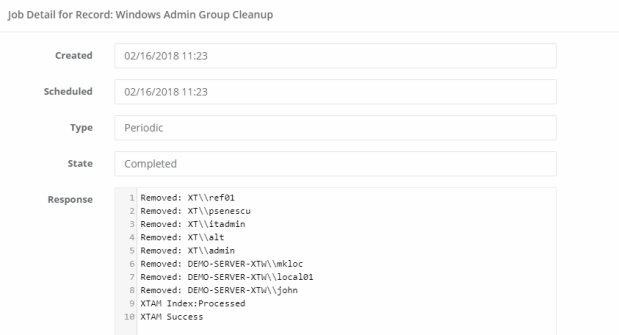
Our default task removes everyone except the local “Administrator” account and the “Domain Admins” group account. If the record’s user is not one of these two accounts, then it too will be removed when executing this task and will subsequently fail during the next execution due to a lack of permissions.
If you want to modify the task to exclude additional accounts from removal or specify a different group to maintain all together, click here for more information.
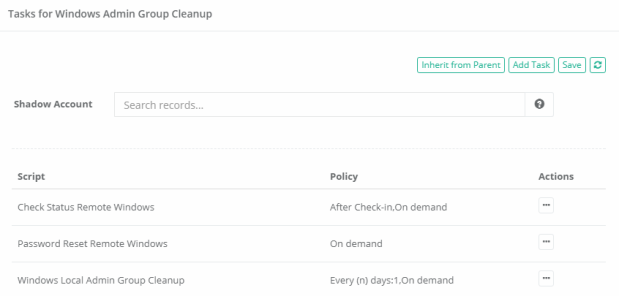
When reviewing the Job History, you will notice two Result states for Completed tasks. The Result “Processed” indicates that the task was run successfully and it found and removed at least one account from the host’s group. The Result “Compliant” indicates that the task was run successfully, however there were no additional accounts found to be removed from the host’s group so it is deemed in compliance with the policy.
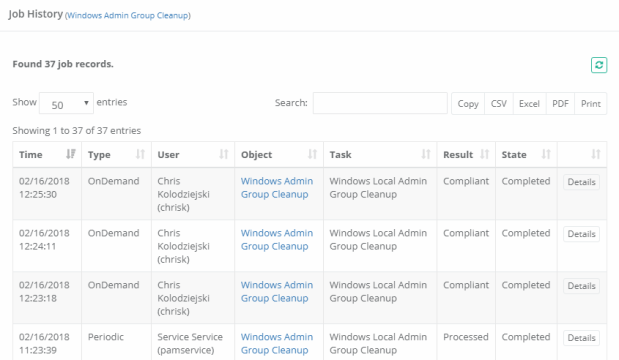
Now that this task was executed successfully and the results confirmed, you may return to the Task and update the policy so that this process can be automated and add it to additional records so you can begin your enforcement across your enterprise.
Bulk Task Execution
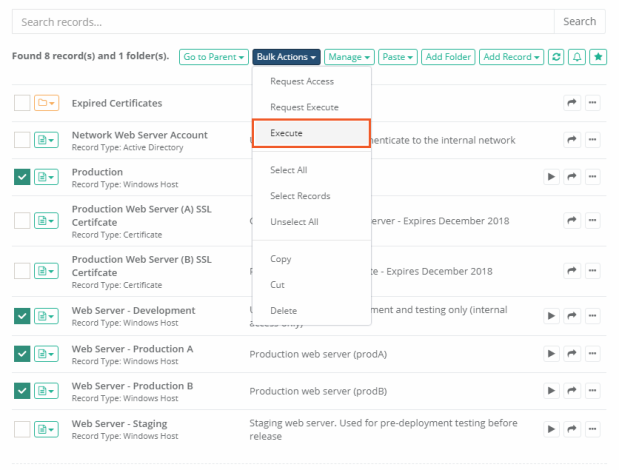
You can also execute this or any task against several records by simply selecting the checkbox option for the records in their folder location then choosing the Bulk Actions > Execute menu option. Next, check the box next to the task name and then finally the Select button to execute this task against the chosen records.
Modifying the task
Modifying the task to exclude additional users or to target a different group.
- Login to XTAM with a System Administrator account.
- Navigate to Administration > Scripts.
- Locate the script named Windows Local Administrators Group Cleanup and click its Edit button.
- In the Custom Code field, take note of the first two lines:
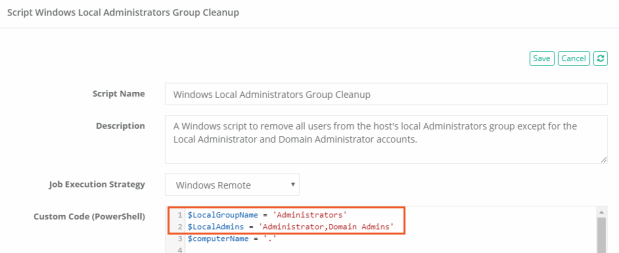
The first line targets the script to the host’s group named Administrators. If you want to target another group change the value between the single quote marks. For example, ‘Guests’
The second line specifies the accounts to exclude from cleanup or removal. If you want to include additional users, add their name to this comma separated list, between the single quote marks. For example, ‘Administrator,Domain Admins,jwilliams’
-
Click the Save button when done.
Once saved, the changes made to this script will automatically be applied to all tasks that are associated to it. We would recommend you test the change before automating it across your enterprise.