Generating of a Self-signed Certificate
I do not currently have a self-signed certificate, but I would like to generate one.
The following section will describe how to use PAM to create your own self-signed certificate (in JKS format) and then configure PAM to use it.
Please note that this self-signed certificate may not be trusted by all your internet browser, so you may still receive a browser security warning.
- Login to the server where PAM is installed.
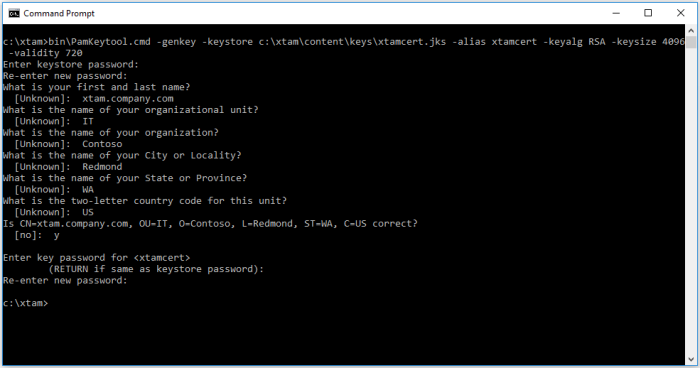
- Open a command line and navigate to the folder where PAM is installed $PAM_HOME and issue the following command:
-
For Windows, substitute your PATH_TO_KEY_STORE.jks with a location where the certificate file will be created and its name (for example, c:\pam\content\keys\xtamcert.jks). ALIAS_NAME is a unique identifying string for the key and can be any value, avoiding spaces and special characters (for example, xtamcert)
Copybin\PamKeytool.cmd -genkey -keystore PATH_TO_KEY_STORE.jks -alias ALIAS_NAME -keyalg RSA -keysize 4096 -validity 720 -
For Unix or Linux, substitute your PATH_TO_KEY_STORE.jks with a location where the certificate file will be created and its name. ALIAS_NAME is a unique identifying string for the key and can be any value, avoiding spaces and special characters:
Copybin/PamKeytool.sh -genkey -keystore PATH_TO_KEY_STORE.jks -alias ALIAS_NAME -keyalg RSA -keysize 4096 -validity 720 - After the command is issued, you will be prompted for a number of values. Enter values as described below:
-
Keystore Password: Create a password for the keystore directory defined in the PATH_TO_KEY_STORE location.
- First and Last Name: The domain name of the server. It looks wrong, but you need to enter the domain name for the certificate here. For example, xtam.company.com.
-
Organizational Unit: Your department name.
-
Organization: Your company name.
-
City or Locality: Your city or locality name.
-
State or Province: Your state or province name.
-
Country Code: Your two letter country code.
- Confirm you information by entering y for Yes.
- Create a new password for the key (as defined by its alias name) or reuse the keystore password by pressing the Enter key.
- The certificate will now be generated in the location defined in PATH_TO_KEY_STORE.jks
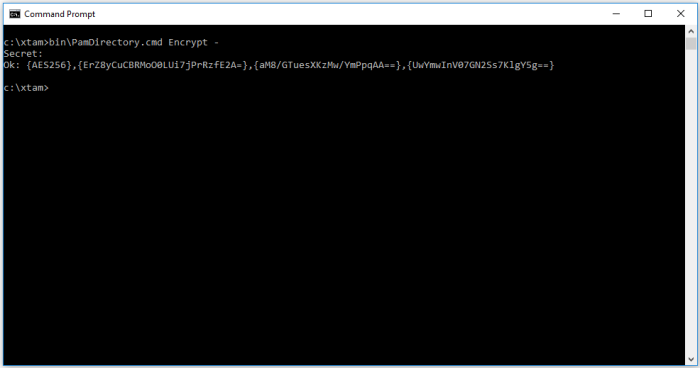
- Now we want to encrypt your key password. In the same command line, issue the following command:
- For Windows:
- For Unix or Linux:
- When prompted, enter your key password (the password from step 5) and press Enter to continue. The command output will display the full encrypted password string after the Ok: prefix.
- Now that we have your new certificate (PATH_TO_KEY_STORE.jks) and its encrypted password its time to configure it for use by PAM. Open the file: $PAM_HOME/web/conf/catalina.properties
- Scroll down or search for the section labeled # SSL Certificate
- In this section, replace the existing path and password with your new certificate and its password.
- xtam.cert.path={PATH_TO_KEY_STORE.jks}
- xtam.cert.password={yourEncryptedPasswordString}
- Save and close this file.
- Restart the PamManagement (Windows) or pammanager (Linux) service.
- Open your browser and navigate to the new login page. Remember, the PAM login will now be located at the domain defined in the certificate. For example, https://xtam.company.com:6443/xtam.


bin\PamDirectory.cmd Encrypt - bin/PamDirectory.sh Encrypt -


To summarize, you now have generated your own certificate, an encrypted password for it and have configured PAM to recognize and use this certificate.
This configuration will allow the use of PAM without the Federated Sign-In module.
Troubleshooting: Key Store Password Incorrect
The same encryption password used in the xtam.cert.password in catalina.properties needs to be the same as the password used in the certificate that has the private key.
To fix the problem:
-
Delete the .pfx file and repackage this again, and then encrypt the password using the command:
-
Instead of using - to prompt for the secret, just Enter the Password directly to ensure that this is the same as was used in the keystore.
-
Copy out the encrypted password text and put this into the catalina.properties file.
PamDirectory.sh Encrypt In order to also use the Federated Sign-In module, then please continue to the next section.
I already have a self-signed certificate encoded in JKS format that I would like to use.