Integration with Imprivata Confirm ID
Configuration for PAM and Imprivata Confirm ID (CIDRA) to provide RADIUS based MFA authentication
PAM supports integration with Imprivata Confirm ID using RADIUS to provide second factor authentication through the use of the Imprivata ID app (token and push).
The following guide describes how to configure your PAM and Confirm ID integration.
Requirements
Before you begin your integration, be sure you meet the following pre-requisites:
- A working PAM deployment with the Federated Sign-In experience.
- Access to your existing PAM host server. You will need to update files and restart services.
- Access to your Imprivata Admin portal to configure your authentication services.
- If Users are created and managed in Imprivata, then a matching user must also be created as an PAM Local User.
- If Users are synced from Active Directory to Imprivata, then you must also integrate PAM with the same Active Directory.
- Users must already enroll their device prior to authenticating with PAM. Device enrollment is not currently supported using PAM.
For customers integrating with Enterprise Access Management (formerly OneSign) v24.1 or higher, for EAM Number Matching feature to retain Push notification support using PAM, customers must update to PAM version 2.3.202410131511 or higher and federated sign-in version 6.5.
Step 1: Begin the Imprivata Confirm ID Configuration
- Login to your Imprivata Admin portal.
- Navigate to Applications > Remote access integrations.
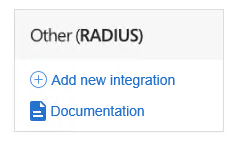
- In the Add new integration section, locate the Other (RADIUS) option and click Add new integration.
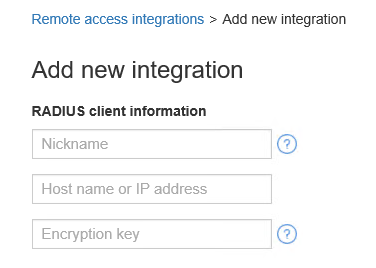
- On the Add new integration page using the guidance below for the RADIUS client information form:
Nickname – use any relevant value you choose. For example, PAM.
Host name or IP address – enter the host name or IP address of the PAM host server.
Encryption key – enter any alphanumeric value in this field which will be used as the shared secret between Confirm ID and PAM.

-
No other actions are required. Click the Save button to complete this configuration.

Step 2: Configuring PAM for Confirm ID
- Login to your PAM host server and open the file $PAM_HOME\web\conf\catalina.properties in a text editor.
- Locate the section that begins with # Radius, RSA Radius, SMSPasscode, etc. This section will contain the following parameters:
-
In the lines referenced above, make updates using your own values as explained here:
- cas.authn.mfa.radius.client.inetAddress=radius-server-host – Enter the host or IP address of your Imprivata Confirm ID appliance. Uncomment this line (remove the # in the beginning).
- cas.authn.mfa.radius.client.sharedSecret=secret – Enter the same alphanumeric value that was entered in the Encryption key in your ConfirmID RADIUS configuration during the previous step. Uncomment this line (remove the # in the beginning).
- cas.authn.mfa.radius.client.authenticationPort=1812 – Uncomment this line (remove the # in the beginning). No other changes are required.
- cas.authn.mfa.radius.client.accountingPort=1813 – Uncomment this line (remove the # in the beginning). No other changes are required.
- cas.authn.mfa.radius.server.protocol=PAP - Uncomment this line (remove the # in the beginning) and change PAP to CIDRA_PAP.
- cas.authn.mfa.radius.name=ConfirmID- Uncomment this line (remove the # in the beginning). For stable work MFA provider CorfirmID this property is required. Enter the CorfirmID name.
xtam.cidra.auth.method=password+push - Add this new line if your CIDRA Log in Workflow Policy is configured for only Password + Imprivata ID.
-
After your finish making the changes above, this section will look similar to this example:
Copy#cas.authn.mfa.globalProviderId=mfa-radius
cas.authn.mfa.radius.client.inetAddress=10.157.65.87
cas.authn.mfa.radius.client.sharedSecret=yourSharedSecretKeyGoesHere
cas.authn.mfa.radius.client.authenticationPort=1812
cas.authn.mfa.radius.client.accountingPort=1813
cas.authn.mfa.radius.server.protocol=CIDRA_PAP
cas.authn.mfa.radius.name=ConfirmID
#cas.authn.mfa.globalProviderId=mfa-radius
#cas.authn.mfa.radius.client.inetAddress=radius-server-host
#cas.authn.mfa.radius.client.sharedSecret=secret
#cas.authn.mfa.radius.client.authenticationPort=1812
#cas.authn.mfa.radius.client.accountingPort=1813
#cas.authn.mfa.radius.server.protocol=PAP
#cas.authn.mfa.radius.name=name
Step 3: Configure RADIUS MFA Requirements in PAM
PAM can be configured to support two scenarios with RADIUS MFA enforcement, all user logins will require Imprivata ID or select principals (users or groups) may require Imprivata ID while others may require a different MFA provider like Duo or TOTP or perhaps no MFA requirement at all.
To configure PAM so that all logins require Imprivata ID:
- Login to your PAM host server and open the file PAM\web\conf\catalina.properties files in a text editor.
-
Search for xtam-mfa.groovy to locate this parameter which you will uncomment like shown below (remove the # at the beginning of the line).
Note that the path defined in the parameter may be different depending on your PAM host (Windows or Linux) and its installation directory.
CopyBefore:
#cas.authn.mfa.groovyScript=file:///C:/xtam/web/webapps/xtam/WEB-INF/mfa/xtam-mfa.groovy -
When finished, save and close the file.
-
Restart the PamManagement (Windows) or pammanager (Linux) service.
-
After the service comes back online, login to PAM with a System Administrator account and navigate to the Administration > MFA page.
-
On this page we will select ConfirmID as the default MFA provider for user authentication. To use Confirm ID, click the Add button, check the Default box and in the Provider dropdown select the option mfa-confirmid. Click Save to complete this configuration. Upon next login, all users not explicitly assigned another mfa provider or none will be required to use ConfirmID as their second factor authentication method.
In the screenshot example configuration below, the DEFAULT provider is set to mfa-confirmid so all users will be required to use this provider as their second factor; however, since the user ‘xtamadmin’ is explicitly set to none as its provider, this account becomes the exception. Upon xtamadmin login, it will not be required to use any (none) second factor for authentication.

For more information about how to configure MFA on this page, please review our article Defining MFA per User or Group.
To configure PAM so that individual logins may use Imprivata ID, TOTP, Duo or No MFA:
- Login to your PAM host server and open the file $PAM_HOME\web\conf\catalina.properties files in a text editor.
- Search for xtam-mfa.groovy to locate this parameter which you will uncomment like shown below (remove the # at the beginning of the line).
- When finished, save and close the file.
- Restart the PamManagement (Windows) or pammanager (Linux) service
- After the service comes back online, login to PAM with a System Administrator account and navigate to the Administration > MFA page.
- On this page, configure your users and groups with the provider that should be required for second factor authentication. To use Confirm ID, click the Add button, select your principals and in the Provider dropdown select the option mfa-confirmid. Click Save to complete this configuration and repeat as necessary for other users or groups.
Note that the path defined in the parameter may be different depending on your PAM host (Windows or Linux) and its installation directory.
For more information about how to configure MFA on this page, please review our article Defining MFA per User or Group.
Step 4: Test your Login Integration
- Navigate to the PAM login page.
- Enter the login credentials, Username and Password, of an account configured with the Confirm ID provider in the previous step. Click the Log in button.
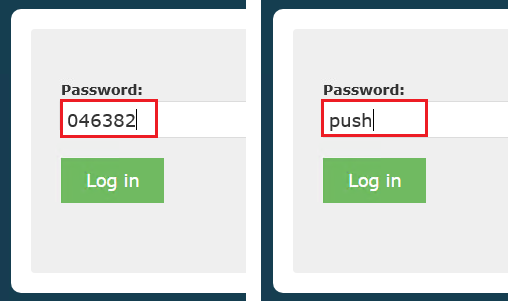
- After the credentials (first factor) are authenticated, you will be prompted for your second factor on the next page. In the field, you may enter the current Token Code as displayed in the Imprivata ID application on your enrolled device or you may enter the word push to receive a push notification to your enrolled device.
- When either the token or push is entered into the field, click the Log in button to continue. If a valid token was entered, the account will successfully login to PAM. If the push option was used, you will receive a push notification to your enrolled device, click Approve and the account will successfully login to PAM.

If you want to be able to send a command "push" in ConfirmID integration,
-
open the file $PAM_HOME/web/conf/catalina.properties in text editor, locate the section that begins with #CAS,
-
add the following line to this file:
Copycas.authn.mfa.radius.client.push=true -
restart PamManagement (Windows) or the pammanager (Linux) service.