Connecting to Sessions
One of the many features of Records is the ability to use them to establish a secured session.
Sessions themselves can be established with or without recording enabled, which we will discuss further in another section of this guide.
For now, let’s use our recently created “Production Web Server” record to create a secure session.
Establishing your First Secure Session
To establish your first session:
-
Open the IT Records folder by clicking on the folder name in the list or by using the folder dropdown or Action menu and selecting Open.
-
If you still have it in your Favorites, then you can click <IT Records> in your left navigation menu for quick access to this folder.
-
-
Open the “Production Web Server” record by clicking on the record name or by using the record dropdown or Action menu and selecting View.
-
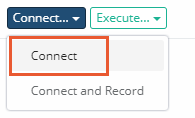
Once in this record’s View page, you will see several options both in the top and bottom rows. Locate the Connect button along the top, click it to expand the dropdown menu and then select the Connect option.
Connect to a Session
-
A new browser window or tab will appear with the message “Connecting to Session Manager”. This message will change to “Connecting to Host” after a few seconds and then finally, the remote desktop connection to your host will appear in your browser.

Session Manager Browser Connecting Message
-
This is a full remote desktop connection so feel free to explore the session’s functionality and responsiveness for a bit.
-
When you are ready to complete the session, you may do so by logging out of Windows (or Unix) as you normally would in a remote session or you could simply close this browser window.
Your first secure session is now complete. Before we proceed with establishing a recorded session, let’s take a quick look at the record’s Session History.
Record’s Session History
Within PAM, every record’s session history is captured and made available throughout the system for quick and easy review.
The session history will capture valuable information about each established session including who created the session, session start and end times, current activity status and whether it was recorded.
In this section, we are going to look specifically at the session history associated to our “Production Web Server” record.
To view our record’s Session History:
-
Open the IT Records folder by clicking on the folder name in the list or by using the folder dropdown or Action menu and selecting Open.
-
If you still have it in your Favorites, then you can click <IT Records> in your left navigation menu for quick access to this folder.
-
-
Open the Production Web Server record by clicking on the record name or by using the record dropdown or Action menu and selecting View.
-
Locate and click the Sessions button along the bottom row of options.

Record's Session History
-
A new view will load that provides details for all sessions (active or completed) associated to this specific record. You will notice that our previously established session is listed and as expected it displays your System Administrator account, the start and end time of the session, status as “Completed” and Recording as “Not recorded”.

Session History
-
At this time, please explore the assorted options that are available in this view including:
-
Filter options along the top to help filter based on time or state.
-
Number of display entries to load.
-
Search box to quickly locate specific events.
-
Export options to download and share the session history with others.
-
-
When you are ready to return, simply click your browser’s Back button. This will navigate you back to the record’s View page.
Secure Session with Recording
Our first secure session was established without recording enabled.
This allowed the user to securely connect to the session and fully interact with the host using their browser without it being recorded, but now we want to introduce the option to add recording to this same session.
Recording is a great option to have because it maintains a record of everything that happened during the session beyond just the basic session history events of “who” and “when”.
Using our same “Production Web Server” record, we are now doing to connect with recording enabled.
To establish a secure session with recording:
-
Open the IT Records folder by clicking on the folder name in the list or by using the folder dropdown or Action menu and selecting Open.
-
If you still have it in your Favorites, then you can click <IT Records> in your left navigation menu for quick access to this folder.
-
-
Open the Production Web Server record by clicking on the record name or by using the record dropdown or Action menu and selecting View.
-
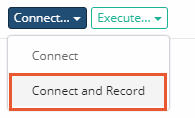
Locate the Connect button along the top, click it to expand the dropdown menu and then select the Connect and Record option.
Connect to and Record a Session
-
As was with the earlier, non-recorded session, a new browser window or tab will appear and in a few seconds, you will be logged into the remote desktop session again.
-
Please note that the message above the session states “(with Recording)” to indicate to the user that this secure session is being recorded.
-
Feel free to use the session for a bit to perform some operations so that activity is recorded and can be reviewed later.
-
-
Unlike earlier, when you are ready to continue with the exercise do not complete this session. Instead, return to your record view still open in another browser window. On the records’ view, open the Session history by clicking the Session button at the bottom of the record’s View page.
-
When the Session page loads, you will see our earlier non-recorded session at the bottom and at the top of the list you will see our current Active session still running. Notice that this current session status is displayed as “Active” and recording shows “Recording…”. Take a moment to explore some of the other options available in the view. Stay on this page when you are ready to continue.

Session History with Active Session
-
Return to the secure session currently running in your other browser window and complete the session as you did previously. You will receive a session completed message when this is done. You may now close this window or tab.
-
Back in the Session History page, click the Refresh button. You will now see that the previously Active session is now “Completed” indicating that this session was closed. You should also note that the Recording status has changed to “Available” and has an action menu.

Completed Session with Recording
-
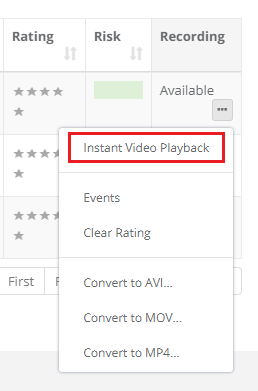
All completed and recorded sessions will have this Available action menu to view the video playback immediately in your browser or to convert and download previously recorded secure sessions. Click the Action menu dropdown and select the Instant Video Playback option. A new browser window or tab will appear, ready to playback the selected session recording. Click the Play button along the bottom of the video to start the playback. You can click along the video timeline to jump forward or backwards.
Recorded Session Video Playback
-
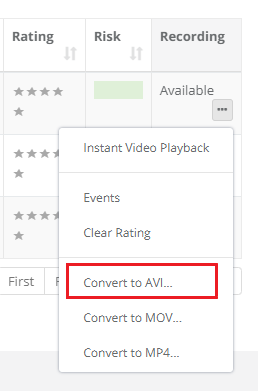
Optionally, you may wish to convert the session video recording into a file that can be downloaded. To do so, click either the Convert to AVI, Convert to MOV or Convert to MP4 options then the file will be converted and a Download button will appear when it is ready.
Video Processing and Download
TIP: If your session included any Session Events (keystrokes, clipboard activity or file transfers), then you can click the Events options in the Action menu to display these events. From this Session Events report you can use the Jump to Recording option to automatically advance to that section of the video.
This concludes the steps required to establish a connection to a record with and without recording.
You may establish more sessions if you wish to further test the connections or even create additional records to test other types.
When satisfied with this exercise, please continue to the next section of this guide.