Installing Privileged Access Management
This section will work through the process of installing Privileged Access Management (PAM) to a Unix computer.
System Requirements
The following are minimum requirements to use PAM for Single Server and medium use Production farms.
Please contact us https://support.imprivata.com/ to discuss architecture and system recommendations for large scale farm deployments.
NOTE: Do not install PAM using a root account. This is not recommended nor best practices for installing or configuring any software in a Unix environment. The recommendation is to create a new user and give it su or sudo(or add to the sudo group) privileges to perform the installation.
| Component | Single Server, Test or Quick Trial | Medium Use Production Farm | Enterprise Production Farm |
|---|---|---|---|
| Windows O/S (64-bit only) | Windows Server 2019, 2022, 2025 / Windows 11 (24H2+) | Windows Server 2019, 2022, 2025 | Windows Server 2022, 2025 |
| Linux O/S (64-bit only) |
RHEL 8.x/9.x, Ubuntu 20.04* LTS/22.04/24.04 LTS, Debian 11/12/13, Rocky Linux 8.x/9.x, AlmaLinux 8.x/9.x* |
RHEL 8.x/9.x, Ubuntu 22.04/24.04 LTS, Debian 12/13, Rocky Linux 8.x/9.x, AlmaLinux 8.x/9.x | RHEL 9.x, Ubuntu 22.04/24.04 LTS, Debian 12/13, Rocky Linux 9.x, AlmaLinux 9.x |
| CPU | 2-4 vCPUs @ 2.4 GHz+ | 4-8 vCPUs @ 2.4 GHz+ | 8-16 vCPUs @ 2.4 GHz+ |
| Memory (reserved for PAM use) | 8 GB minimum, 16 GB recommended | 16 GB minimum, 32 GB recommended | 32-64 GB recommended |
| Disk Space (reserved for PAM use) | 50 GB minimum | 100-200 GB | 500 GB - 2 TB+ |
| Disk Type | Standard HDD acceptable | SSD recommended | SSD/NVMe required |
| Database | Included (Apache Derby)** | MS SQL, MySQL, Oracle, PostgreSQL | MS SQL, PostgreSQL, Oracle (external, dedicated) |
*Ubuntu 20.04 legacy support - upgrade recommended
**For Single Server, Test or Quick Trial deployments the recommendation is to use the included, internal database however you can use any of the other supported databases that are available to you.
Important: Disk space requirements increase significantly when session video recordings are enabled. Plan for 10-100+ GB per month of additional storage depending on session volume and retention policies.
Software Requirements
-
Web Browsers (latest version is recommended if not specified)
-
Windows Edge, Google Chrome, Mozilla Firefox or Apple Safari
-
External Database
The default installation includes an internal database that can be deployed. If you would prefer to use an existing database in your environment, the following are supported.
Please be prepared to supply a valid connection string to your database as well as an appropriate user and password to successfully establish this connection. Please contact your Database Administrator if you need assistance.
NOTE: The installation process does not create its own database or tablespace but rather makes use of an existing one. Also, for Oracle DB you just need to create a user (you do not need to create a new data base). With that in mind, please ensure one with the name “PamDB” already exists as this will be used by the application.
- Apache Derby version 10.12.1.1+
- Microsoft SQL version 2016+ (SQL Authentication only)
- MySQL Community or Enterprise Edition version 5.7+
- Oracle version 11.2+
- PostgreSQL version 9.5+
Installation
The following section will describe each option that is available when executing the Unix installation shell script.
Software binaries can be downloaded from https://help.xtontech.com/content/more-information/binary-distribution-and-signatures.htm.
To begin, run the shell script from the location where you want to install the software.
Depending on the options selected, the following configuration parameters may be available.
TIP: Rather than using the Unix /tmp folder to perform the installation, create a new folder because background processes on the host may attempt to “clean” this directory during this process. Suggested locations would be either /opt/pam or /usr/local/pam.

Execute Installation Shell Script
License Agreement
Press <ENTER> to read the license agreement and enter <Q> when complete.
When prompted, accept the license agreement by entering <Y> to continue.
The license agreement must be accepted to install the software.
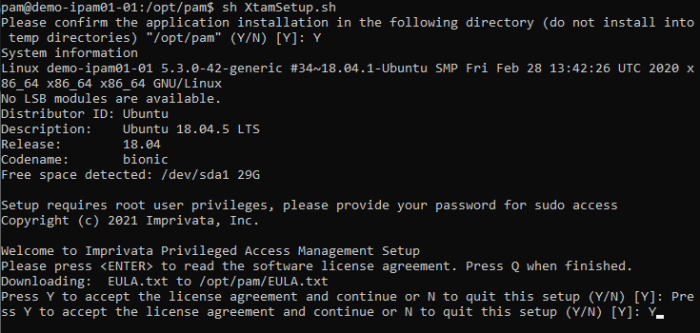
Read and Accept the License Agreement
Components
Choose from the available list of components to install on this computer.
If you are looking to deploy a quick test environment, the recommendation is to accept the default options by pressing the <Enter> for each component.
If you would like to customize the installation, then please review the following sections to understand the purpose of each component and enter the <N> key to exclude a component.
Please note that while you can choose to not install some components on this computer, they may still be required for proper software operations.
For example, you may wish to install the Session Manager service on another system for performance optimization.
In this situation, you would choose to not deploy this service on your primary host and then after this initial installation is complete, you would then run this same script on your other host and only choose the Session Manager option.
Later on in the configuration of the software, you will have the ability to define which workstation is running each service.
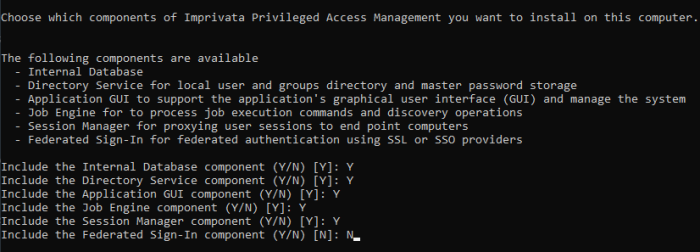
Choose Components
Internal Database
This option will define which database to use.
When included (<Y>) the installation will deploy, configure and use its internal database.
If excluded (<N>), you will be prompted to supply an existing database in your environment to use (connection string, user and password).
Please review the requirements section for more information about External Database support.
For single server or test environments, the recommendation is to include (<Y>) this option to use the included database.
Directory Service
This option will define which user store to use.
When included (<Y>) the installation will include a local user store that can be used to create users and groups and a database to secure the master password.
When excluded (<N>) the installation will not deploy this component to the computer; however, this is a required component so it must be deployed to only one other computer and configured post installation in PAM.
To install this component on another host, simply run the script on that system and include (<Y>) this option.
The recommendation is to include (<Y>) this option during installation.
Application GUI
This option will define the deployment of the PAM interface (GUI). When included (<Y>) the installation will include the manager interface (GUI) to this host computer.
When excluded (<N>) the installation will not deploy the GUI requirements to this host computer.
To install this component on another host, simply run the script on that system and include (<Y>) this option.
The recommendation is to include (<Y>) this option during installation.
Job Engine
The Job Engine is required to execute background operations like discovery queries and password resets.
This option defines the deployment of a worker role to this host computer.
When included (<Y>) a Job Engine role will be deployed.
When excluded (<N>) a Job Engine role will not be deployed to this computer.
To install this component on another host, simply run the script on that system and include (<Y>) this option.
Please note that at least one job engine should be present in the farm to execute password reset, remove script execution or discovery queries.
The recommendation is to include (<Y>) this option during installation.
Session Manager
The Session Manager component is required to establish, control and record privileged sessions.
This option defines the deployment of a session manager service to this host computer.
When included (<Y>) a session manager service will be deployed, configured and run from this host.
When excluded (<N>) a session manager service will not be deployed.
To install this component on another host, simply run the script on that system and include (<Y>) this option.
Review the following section if you intend to install Session Manager on a remote computer(s): Remote Session Manager Configuration
Please note that if a session manager service is not defined during installation, you will need to add one during system configuration before sessions can be established.
The recommendation is to include (<Y>) this option during installation.
Federated Sign-In
This option defines the deployment of a federated sign-in component that can be used to establish user authentication.
When included (<Y>) you will need to supply your federated sign-in server connection parameters.
When excluded (<N>) a SSO server will not be configured and the default login authentication will be used.
To install this component on another host, simply run the script on that system and include (<Y>) this option.
This is an advanced option and should only be included if necessary. For single server or test environments, the recommendation is to not include (<N>) this option.
NOTE: The Federated Sign-In component requires the use of a properly trusted (not self-signed) SSL certificate which is used to communicate over a secure HTTPS connection. This ensures that both the client browsers and server side components trust the certificate. If you do not want to deploy and configure a trusted certificate, then do not include this component during installation.
Component v.6.5 or 5.2
This option defines the deployment of which version of federated sign-in component should be used to establish user authentication to this host computer.
When printed (<1>) a CAS v5.2 (legacy version recommended for extending PAM deployments which are currently use v.5.2) will be deployed.
When printed (<2>) a CAS v6.5 (recommended for all new deployments) will be deployed.

CAS Components
System Administrator
Enter the required parameters to create your default System Administrator login to PAM.
The account specified here may be used as the first System Administrator, so be sure to choose a memorable login (default login is “pamadmin”) with a strong password (maximum of 30 characters).
Both the user login and password will be displayed later when they can be saved to a file for safe keeping.
Press the <Enter> key after each field to continue.

Create PAM System Admin Account
SSO Connect
To define a managed path to be used with federated sign in, select (<Y>) the SSO option and then enter that valid path in the Managed Path field.
If PAM is to be used with an SSL certificate, then this option should be enabled and the managed path needs to be defined with a secure path (for example, https://host.example.com).
Press the <Enter> key to continue.

Enable and Define Federation Connection (optional)
External Database
If the Internal Database option was excluded (<N>) earlier, then you will now need to define your connection to your external database.
Choose your database type by entering the number to the left of its name and then press <Enter>.
You will then be required to enter the database host, connection and a user and password to establish a successful connection.
If further assistance is required, please contact your Database Administrator.
NOTE: The installation process does not create its own database or tablespace but rather makes use of an existing one. With that in mind, please ensure one with the name “PamDB” already exists as this will be used by the application.
Example strings are listed below.
-
Remote Embedded Database [1]
-
Example connection string: db-host or db-host:port
-
-
Microsoft SQL Server [2]
-
Example connection string: db-host or db-host:port
-
A database with the name “PamDB” must already exist and will be used for the application. Ensure the supplied account is the “owner” of this database and it is a SQL account for authentication. Active Directory accounts are not supported.
-
-
-
Oracle [3]
-
Example service: db-host/db-service
-
Example instance: db-host:port:SID
-
Grant (at a minimum) “CONNECT, RESOURCE, UNLIMITED TABLESPACE” to the supplied user account.
-
-
-
MySQL [4]
-
Example connection string: db-host or db-host:port
-
A schema with the name “pamdb” must already exist and will be used for the application. Ensure the supplied account has ALL schema privileges assigned.
-
-
-
PostgreSQL [5]
-
Example connection string: db-host or db-host:port
-
A database with the name “PamDB” must already exist and will be used for the application. Ensure the supplied account is the “owner” of this database or has been provided with “ALL” privileges to it (CTc).
-
-

Connect to an External Database (optional)
Active Directory Integration
Optionally, you may choose to integrate PAM with your existing Active Directory or LDAP server.
Enter your LDAP Server FQDN, your Active Directory or LDAP User (user@domain.com or domain\user), its Password, Repeat the Password and then the <Enter> key.
If the connection is successful, this user may become a System Administrator in PAM and you may continue.
If you cannot or do not want to integrate with Active Directory or LDAP, simply enter <N> at the prompt and <Enter> to continue with the setup.

Active Directory or LDAP Server Integration
Installation Complete
When the installation is complete and all services are started, the following summary will appear.
The summary will display the services, accounts and passwords that were created during installation.
It is extremely important that the example information highlighted in the yellow box below be saved to a file and kept in a safe location.
The Master Password displayed will be required in a “break glass” or database transfer scenario and no one will be able to identify nor update this password if it is ever lost.
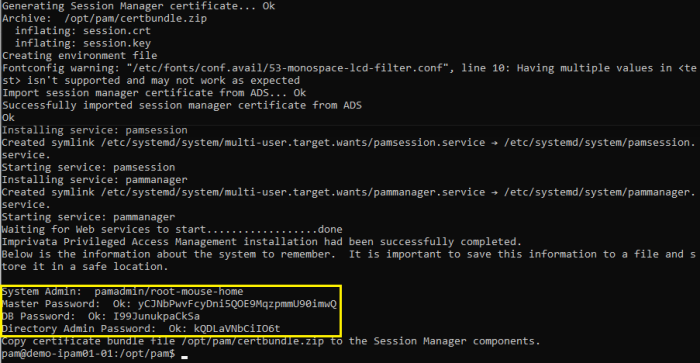
Summary Screen with Passwords (save this information to a file for safe keeping)
If you do not see these passwords or receive any errors in this Summary screen the installation was not successful.
Complete the installation and then uninstall to try again.
Do not initialize PAM without a successful deployment and a safe and secure copy of the logins and passwords shown in the example Summary screen.
Privileged Access Management is now installed and ready for initialization. You can now exit the installation session and login to PAM at https://localhost:6443/xtam/.
NOTE: It is extremely important that all the passwords displayed in this section are saved to a file and this file is stored in a safe location. These passwords cannot be retrieved by development team or anyone else once the installation is complete.
Linux deployment of HA and DR nodes
The option to Linux installation script to deploy the new system with the provided master password instead of generated one to simplify deployment of High Availability or recovery nodes.
This is simplifies deployment of additional or disaster recovery nodes based on the main node master key to decrypt system data.
Previously the option was available in a post-installation script replacing system master password with a new one.
To activate the feature use -mp MASTER-PASSWORD option in Linux installation script replacing MASTER-PASSWORD place-holder with the master password of the main node.