HTTPS Proxy Sessions [Deprecated January 2022]
This feature has been deprecated and is no longer supported. For web site sessions, please use either the Browser Extension for login filling or a Remote App for secured sessions.
Creating secure PAM web sessions using your native browser.
This article will describe how to enable, configure and use the PAM HTTP Proxy feature. If you want to first understand, conceptually, how it works, please review our PAM HTTP Proxy Overview.
Privileged Access Management provides quick, easy and reliable methods to create secure, password-less sessions to remote endpoints using the most common protocols like RDP, SSH, VNC, Telnet and others.
In this article we will describe the configuration required to expand our supported protocols to enable secure remote sessions to websites, portals or custom web applications.
For the Table of Contents, please note which person is responsible for each step. For System Administrators, they will need to complete steps 1-3 (and optionally 4), while users are responsible for only steps 4 and 5.
1. Enabling HTTP Proxy in PAM (for System Administrators)
2. Configuring your Network Proxy (for System Administrators)
3. Creating a HTTP record in PAM (for System Administrators or Owners)
4. Import PAM’s Browser Certificate (for Users)
5. Connecting to your HTTP Session (for Users)
There are several configuration options presented in this guide, so we recommend reading through the entire article first, then deciding which is most applicable for your needs and requirements before you begin the deployment.
1. Enabling HTTP Proxy
Enabling HTTP Proxy in PAM (for PAM System Administrators):
- Login to PAM with a System Administrator account.
- Navigate to Administration > Setting > Parameters.
-
Locate and modify the following settings:
-
HTTP Proxy: Switch this option to Enabled and click the Save button to its right. After it is saved, refresh your browser before you continue.
-
HTTP Proxy Port: Use or change the port value that PAM will use for HTTP proxy and click the Save button to its right.
-
HTTP Proxy Domains: Enter the domains that will be specifically used by PAM’s HTTP Proxy (mutliple domains should be separated with a comma). For example, github.com, salesforce.com, office.com, hubspot.com.
Proxy Domains are only required if you are using the PAM Browser Extension for proxy configuration. If you are using .pac scripts, then this field may be left empty.
-
HTTP User Placeholder: Use the default or change the value to what you want user’s to have to enter in the website’s User login field. The HTTP User Placeholder cannot be “user” nor can it be the same as the HTTP Password Placeholder value.
-
HTTP Password Placeholder: Use the default or change the value to what you want user’s to have to enter in the website’s Password login field. The HTTP Password Placeholder cannot be “password” nor can it be the same as the HTTP User Placeholder value.
These placeholders values are what you will give to your users that they will then enter into the web portal’s login form. This is not the actual username and password for the web portal itself, which will be stored in the PAM record later in this guide.

-
-
Once both settings have been updated and saved, restart the PamManagement service (Windows) or pammanager service (Unix/Linux).
-
When the services is fully restarted (can take 1-5 minutes), the HTTP proxy module is online.
2. Configuring
Configuring your Network Proxy (for PAM System Administrators).
In order for PAM to process these web domains, they must be properly included in either your corporate proxy setup or your browser’s network proxy configuration.
All scenarios will be described now, however you may only need to implement one method to use PAM’s HTTP Proxy feature.
Option 1. Configure your Corporate Network Proxy using .pac Scripts
Option 2. Configure individual Browser’s Network Proxy using .pac Scripts
Option 3. Configure individual Browser’s Network Proxy using the PAM Browser Extension
Corporate Network Proxy
Configuring your Corporate Network Proxy.
This example will assume your corporate proxy is defined using a deployed .pac script.
There are several other methods that can be used for proxy configuration, so if you are unsure please contact your Network Administrator for assistance.
- Access your .pac file and add an entry for each domain that will be used by PAM’s HTTP Proxy feature.
- These domains should return to the PAM host followed by the HTTP Proxy Port mentioned earlier.
- Here is an example that can be used for guidance. Adjust the values and syntax as needed.
-
Once complete, save and redeploy this .pac file.
function FindProxyForURL(url, host) {
if (dnsDomainIs(host, ".github.com")
|| dnsDomainIs(host, ".twitter.com")
|| dnsDomainIs(host, ".twitter.com")
|| dnsDomainIs(host, "login.microsoftonline.com")
|| dnsDomainIs(host, ".office.com")
|| dnsDomainIs(host, ".hubspot.com")
|| dnsDomainIs(host, ".service-now.com")
)
return "PROXY xtam.company.com:8081";
return "DIRECT";
}
Browser’s Network Proxy
Configuring your Browser’s Network Proxy.
This example will assume you want to configure the network proxy in only specific browsers.
This can be done using Windows Proxy Settings (in the case of Internet Explorer or Google Chrome) or the browser’s Proxy Settings (in the case of Mozilla Firefox).
You can use the .pac file example above and import it directly for use in your host’s browser using the following methods:
For Internet Explorer, Google Chrome or any other browser that uses Windows default Internet Options:
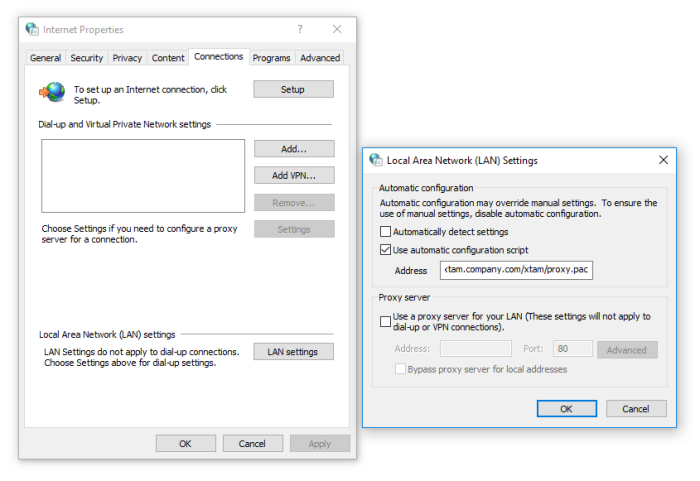
Open your Windows Internet Options, navigate to the Connections tab and choose the LAN settings option. Check the Use automatic configuration script and enter the path to the web URL of your .pac script. Click OK when finished.
For Internet Explorer, Edge, Chrome or Safari, your .pac file must be served from a web server. You cannot define a local file path, it must be delivered from a web URL.
To provide a more streamlined experience for HTTPS Proxy users, PAM now automatically generates and serves this proxy.pac file. Your users can now simply enter the proxy.pac file URL from PAM into their browsers to make quick use of this proxy. The proxy.pac URL will resemble this:
https://xtam.company.com/xtam/proxy.pac which is constructed from the URLs added to Administration > Settings > Parameters > HTTP Proxy Domains.
For Mozilla Firefox or any other browser that uses its own Network Proxy configuration:
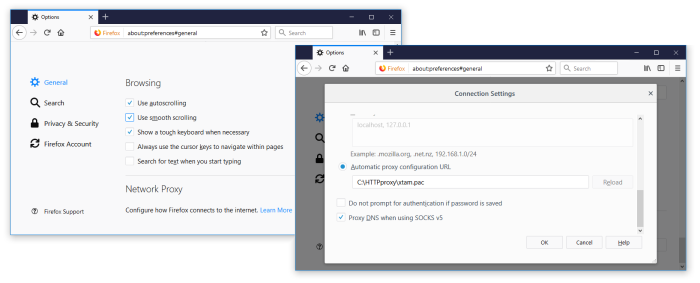
Open the browser’s Options menu, locate its Network Proxy section, click Settings and then enable its Automatic proxy configuration URL by selecting or entering the path to the location of your .pac script. Click OK when finished.
PAM Browser Extension
Configuring your Browser’s Network Proxy using the PAM Browser Extension.
Alternatively, you can use the PAM Browser Extension available in either the Chrome or Firefox store.
The use of this extension will allow for the automatic configuration of the proxy settings (Enable and Disable) so the end user does not need to modify settings, scripts or files manually.
- Google Chrome (external link to the Imprivata PAM Broker Browser Extension for Chrome)
- Mozilla Firefox (external link to downloading the Imprivata Access Manager extension for Firefox)
- Microsoft Edge (Chromium) (external link to the Imprivata PAM Broker Browser Extension)
- Opera (see installation procedure here)
To use the PAM Browser extension, simply locate the extension in your browser’s store and deploy it as usual.
When deployed, click the Gear icon to define your PAM host URL (The default URL is http://localhost:8080/xtam but often times this is modified. ), check the box to enable the HTTP Broker and then finally click Login to complete the process.
When this entire process is complete, the extension will make the necessary adjustments to the browser’s proxy configuration to enable PAM’s HTTP Proxy feature.
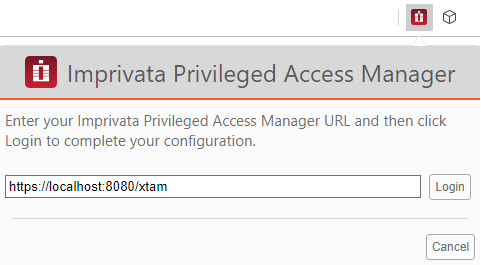
Please note that the PAM browser extension is now controlling specific domains using proxies settings in your browser and therefore your browser may display a message indicating this behavior. This is the expected behavior and you should accept this message to continue using the extension for PAM HTTP proxy sessions.
More about additional functionality of PAM Broker Browser Extension.
3. HTTP record in PAM
Creating a HTTP record in PAM (for PAM System Administrators or Owners):
- In PAM, create a new record using the record type Web Portal.
- Populate all the fields with your endpoint’s connection details.
URL: Enter the URL to the web site’s page that contains the login form. For example, https://github.com/login
User: Enter the username of the account that will be used to login to the website.
Password: Enter the password for this account.
Please note that the User and Password values defined in the Web Portal record are the actual login credentials for the web portal. This is different than the HTTP Placeholders that are defined in the PAM Administrator Settings.
-
Click the Save and Return button.
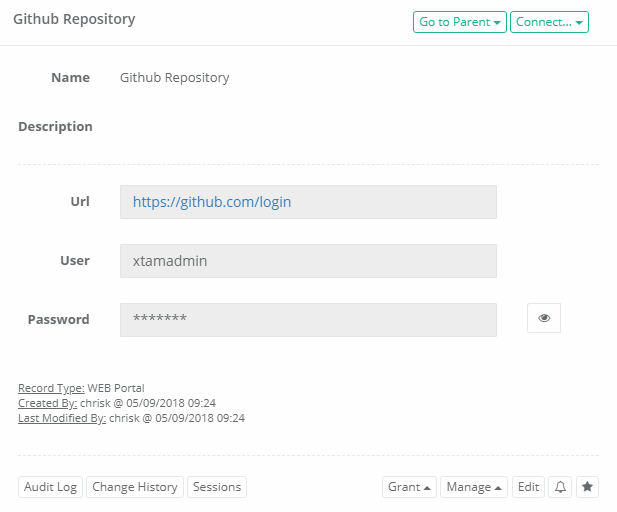
Your record is now saved and under management in PAM.
Permissions and workflows can also be applied to your users or groups ensuring only authorized personnel can access to the record.
4. Browser Certificate Import
Import PAM’s Browser Certificate (for PAM Users).
In order for the HTTP Proxy to work properly with secured connections, you will need to import PAM’s certificate into Windows or your browser directly.
This step needs to be performed on the user’s computer, not the server that hosts PAM.
If possible, your Network or Security Administrators may be able to deploy the certificate to the computers on behalf of the user(s).
Please work with your internal IT department for further assistance.
- Login to PAM with your user account
- Navigate to Management > My Profile > Preferences and click the Download button for Certificate.
- Save the certificate file somewhere safe on your computer.
- Deploy or install the certificate on your computer using the method described for your browser of choice:
(Windows) For Internet Explorer, Google Chrome or any other browser that uses Windows default certificates:
Double click on PAM’s certificate.cer that you just downloaded to begin the import process
Click Open on the security warning dialog
In the certificate’s dialog, click the Install Certificate… button
In the Certificate Import Wizard, select Current User for Store Location and then click Next
For Certificate Store, select Place all certificates in the following store, click Browse and then select Trusted Root Certificate Authorities
Click Next and then Finish on the final screen
After the certificate imports successfully, restart your browser.
(Mac OSX) For Google Chrome on Mac OSX:
Open the application Keychain Access and navigate to the System keychain
Drag and drop the downloaded certificate.cer file to the System keychain
Enter the password for your account when prompted, then click Modify Keychain
The certificate will now be added, however it will be untrusted. Double click on the certificate listed in the System keychain. When the certificate settings popup appears, expand the Trust section
In the Trust section, for the option When using this certificate, select Always Trust in the dropdown menu and then close this certificate popup
Enter the password for your account when prompted, then click Update Settings
After the certificate imports successfully, restart your browser.
(Windows or MacOSX) For Mozilla Firefox that uses its own certificate store:
Open Firefox’s Options page and locate the section for Certificates
Click the View Certificates button
In the Certificate Manager, select the Authorities tab along the top
From the Authorities tab, click the Import… button, select PAM’s certificate.cer file and then click Open
When prompted, Enable the option Trust this CA to identify websites and then click OK
After the certificate imports successfully, restart your browser.
5. HTTP Session
Connecting to your HTTP Session (for PAMUsers).
Now that the HTTP Proxy feature has been configured, proxy configuration has been created and the Web Portal record exists in PAM and the certificate was imported, it is time to Connect to the web session.
- Login to PAM with an account that has Connect permissions to this record.
- Open the record and click the Connect option.
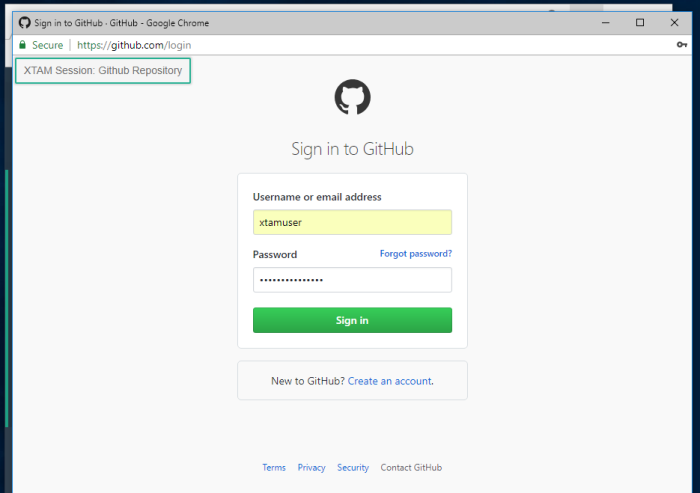
- A new browser tab or window will open to the URL that was defined in the record. You will notice that a popup appears in the upper left indicating that this is a proxy-ed PAM Session (PAM Session: Record Name).
- On the web portal’s Username field, enter the HTTP User Placeholder value, not the User value defined in the record itself nor your login account to PAM.
- On the web portal’s Password field, enter the HTTP Password Placeholder value, not the Password value defined in the record itself nor your login password to PAM.
- Click the web portal’s Login or Sign In button to initiate the authentication process.
At this time, PAM will replace the Placeholder credentials entered in the web portal’s login form with those defined in the record and login the user. This process will not disclose the actual login credentials and will be entirely invisible to the end user.
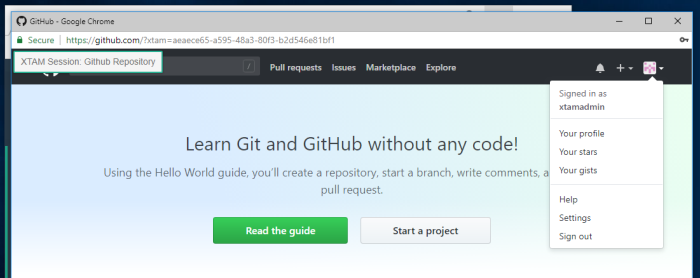
The user will now be logged into the web portal with the credentials defined in the PAM record. To confirm that the session is being provided via PAM, you can navigate to the Session tab of this record and note that there is now an Active session for this user.

When the User is finished, they can simply Logout of the web portal and close their browser window or tab to complete the active PAM session.