Secure Remote Sessions (Connect)
PAM can be used to establish secure, interactive sessions to remote Windows, Linux, Unix or Mainframe endpoints, Network Devices like Cisco, Juniper or Palo Alto, and Websites or Web Management Portals, all while using a standard web browser or native SSH clients without disclosing your secrets or passwords.
Connect
Connections to these remote endpoints or assets originate from the record that contains the values for the endpoint.
To create a new connection to a remote endpoint, click the Connect button from the Record List page ( ) or click the Connect button located in the record when it is viewed. A new session will be launched in your browser using the settings as configured from your preferences.
- If you are presented with both a Connect and Connect and Record option, then choose the method that you wish to connect using.
- The Connect and Record option will record your session as defined by your Session Control permissions, while Connect will not record.
- The Connect option may be shown as Request Connect which indicates that you are required to request access before you are able to connect.
- Once your request has been submitted and approved, the Request Connect button will switch to Connect for the time period that you have been approved.
- When the requested time expires, the Connect button will return to the Request Connect state and you will need to request access again.
- To check the status of your Workflow Requests, visit your My Workflows pages.
- If the Connect option is not available, then either the record is not configured to support remote sessions or you lack the required permissions to create a connection to the endpoint.
In-Session Menu
While in an active browser session, you can open the In-Session Menu to utilize additional options.
To activate the In-Session Menu hover your mouse pointer in the top 30 pixels of the remote session for a second or two.
The menu will then dropdown from the top of the session and provide the following options:

|
Show Keyboard / Hide Keyboard |
Click to Show or Hide the onscreen keyboard. |
|
Keyboard Layout Selector |
Used to select your keyboard language layout. |
|
Clipboard |
Opens the clipboard menu so that text can be copied into or out of the remote session. |
|
File Browser |
Opens the File Browser to allow files to be transferred into or out of the remote session. |
|
Show Participants |
If multiple participants are joined to the same session, this will display the list of participants, their IP address and the Owner label indicating who is the user who created the initial session. When the Owner disconnects, the session will complete for all participants. |
|
Zoom Controls |
Click the + and – buttons to zoom in or out of the session in your browser. Click the 100% button to return to full screen. |
To close the menu simply move your mouse pointer away from the menu for a few seconds or press the Esc key on your keyboard.
Join
An Active remote session can be joined by one or more additional participants. These additional participants may either watch the session in real time or they can interact with it and take control of the keyboard and mouse.
To join an active session, locate the session you wish to join from the Record’s Session or System’s Session report, click the Actions menu and then select the Join option.
- Confirm that you wish to join the active session and you will enter the active session in a few seconds.
- Newly joining participants will be visually announced to all current participants and will appear in the Show Participants menu along with their current IP address.
- To leave a joined session, simply close your session’s browser or tab window.
- Departing participants will be visually announced to all current participants and will then be removed from the Show Participants menu.
- If the Owner of the session, the user who created the initial connection, leaves or disconnects then the session will complete for all participants within a few seconds.
Terminate
An Active remote session can be terminated by another user with the required permissions.
When an active session is queued for termination, the session will be force completed without warning within approximately one minute.
To terminate an active session, locate the session you wish to terminate from the Record’s Session or System’s Session report, click the Actions menu and then select the Terminate option.
Confirm that you wish to terminate the active session and it will be queued for termination.
Neither the session’s Owner nor any other participants will receive a warning or notification that their session is being forcibly terminated.
Their active session will close and be logged as Completed within approximately 60 seconds.
Automatically terminate
The inactivity timeout option automatically terminates RDP Proxy sessions.
To enable the option specify idle timeout in seconds in the global parameter RDP Proxy Idle Timeout.
Disconnect open RDP proxy session if it is idle for the specified number of seconds.
If set to 0 then it will never disconnect idle sessions. Use zero to disable idle timeout enforcement.
Windows Logoff Disconnection
When a user closes remote RDP sessions without a proper log off procedure leaving open disconnected sessions on the remote computers waiting to timeout, the Windows Logoff Disconnected Sessions script could be used in the After Session event trigger to forcefully log off disconnected inactive sessions from Windows computers.
The script assumes PowerShell access to the remote endpoint with the option to terminate sessions.
The script could be scheduled to run using a shadow account with administrator privileges and allows maintaining data security on the remote servers by minimizing the time of opened RDP sessions.
Recording
Sessions that are configured for recording via Object Permissions, will be done so either automatically or by the user’s decision in the case of Optional recording.
-
When a user has the Always recording configuration assigned, their sessions will always be recorded. The option to not have their session activities recorded is unavailable. The Connect option will always record their session.
-
When a user has the Optional recording configuration assigned, their sessions can be recorded or not depending on the user’s decision. When this user selects the Connect option, a dropdown menu will appear and present their choice to either Connect or Connect and Record.
-
When a user has the No recording configuration assigned, their sessions will not be recorded. The Connect option will not record their session.
Session recording consists of two components; Screen Video Recording and Session Event Recording.
Video Recording
A session with video recording enabled is generating a full resolution video all user interactions performed while connected, that can be later played back using your web browser or converted to a video file.
Playback includes Play, Pause and Scrubbing functions and is made available immediately after the session changes from Active to Completed status.
To view the playback of a recorded session in your browser, locate the session you wish to view from the Record’s Session or System’s Sessions report, click the Actions menu and then select the Instant Video Playback option.
A new browser window or tab will open to load the playback, and you can press the Play button to start at the beginning of the recording or use your mouse to start at another time by clicking on the playback timeline.
The Instant Video Playback cannot be viewed outside of the system.
To convert the playback to a video file that can be viewed or shared outside of PAM in a native video player, locate the session you wish to convert from the Record’s Session or System’s Sessions report, click the Actions menu and then select the Convert to AVI, Convert to MOV or Download (zip) options.
The video will be queued for Rendering and will eventually change to a Download link when the rendering is complete.
Click the available Download link to save the file to a file share.
|
Convert to AVI |
(In-browser web sessions only) Select this option to convert the video recording to a .avi video file. |
|
Convert to MOV |
(In-browser web sessions only) Select this option to convert the video recording to a .mov video file. |
|
Download (zip) |
(SSH Proxy sessions only) Select this option to download the native SSH proxy session recording. The zip download will include typescript recorded session in a native format (individual metadata, timing and typescript files). These files can be used for playback using the native Linux scriptreplay command. |
Session Event Recording
A session with session event recording enabled is generating a Session Event report containing user interactions performed while connected.
Session Events include keystrokes, clipboard copy and file transfers, both to and from the remote endpoint.
These Session Events are recorded while the session is still active, so you can review the report during Active sessions and after Completed sessions.
To view the Session Event report, locate the session you wish to review from the Record’s Session or System’s Sessions report, click the Actions menu and then select the Events option.
The Session Events report will open and display a list of events that have been generated.
If the session is still Active, you can use the Refresh button to update the session as events are captured, while Completed sessions will display all events, sorted from newest to oldest in terms of session time.
For each event, there is an Action menu that may provide additional options:
|
Details |
For keystroke and clipboard events, the Preview column displays the first 1024 characters. If the event is larger than 1024 characters, this Details option will display the full series of characters. |
|
Jump to Recording |
For completed sessions that were also video recorded, this option will start the in-browser Instant Video Playback at this event’s timestamp. |
For more information about the Session Event report itself, see our Session Event Report article.
RDP Client Proxy Sessions
When PAM’s RDP Proxy feature is enabled, you can use a native RDP desktop or mobile client or prompt to connect to a record and provide a secure experience while maintaining control of the privileged rdp-enabled endpoint.
NOTE: The RDP Proxy feature must be enabled and configured by a System Administrator. If you would like to use this feature, please talk with your System Administrator for additional information.
Connecting to a Managed Windows Endpoint using an RDP Client
To connect to a managed endpoint from your RDP client, enter the PAM host and port as provided to you by your System Administrator in the client’s Host or Computer field.
For example, the RDP Host or Computer you would enter into your RDP client would be xtam.company.com and the default port would be 3388.
For the Username value, you will enter a connection string as shown demonstrated in the example scenario below.
This connection string as the User will both provide a means to authenticate your account in PAM and determine which record to use to create the secure session.
We want to connect to a rdp-enabled Windows endpoint managed by the record with the name Windows Production Server and ID i-hyG1KUfAHh8.
In the RDP client’s Username field, we will enter the string john#Windows Production Server or john# i-hyG1KUfAHh8 where john is our login name for PAM.
After the connection is initiated, enter your password when prompted and in a moment your RDP client will connect to the rdp-enabled endpoint stored in this record.
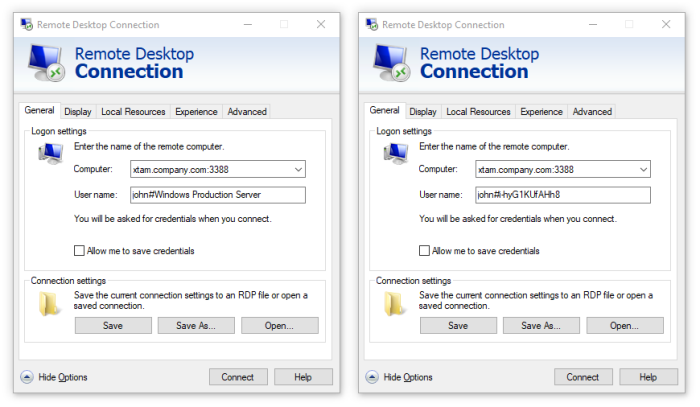
NOTE: To connect directly using the record name, the name must be unique. If two or more records exist with the same name, then you must use the record ID to connect as that is always a unique value.
When you are finished with your RDP proxy session, simply use the normal Disconnect or Sign out option in Windows to complete your session.
SSH Client Proxy Sessions
When PAM’s SSH Proxy feature is enabled, you can use a native SSH desktop client or prompt to connect to a record and provide a secure experience while maintaining control of the privileged ssh-enabled endpoint.
NOTE: The SSH Proxy feature must be enabled and configured by a System Administrator. If you would like to use this feature, please talk with your System Administrator for additional information.
Connecting to the SSH Proxy Interface
To connect to the PAM SSH Proxy Interface in your SSH client, enter the PAM host and port as provided to you by your System Administrator.
When authenticating to the PAM SSH Proxy Interface, enter your same username and then password that you enter to login to the PAM web portal.
Optionally, the SSH Proxy connection also supports the use of Public/Private key pairs for authentication.
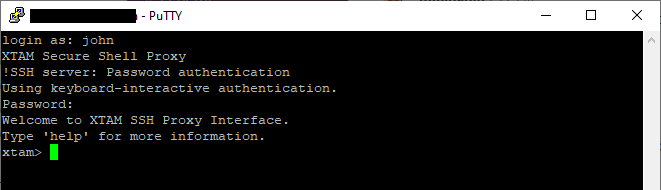
Once successfully connected, you will be greeted with the message Welcome to PAM SSH Proxy Interface and an xtam> prompt.
From the xtam prompt, these commands are available for use:
|
help, ? or help <command name> |
The Help command prints a list of available commands and a brief description. |
|
records or rec |
The Records command generates a list of records, in the format List Number) Id: Record ID Record Name, that are available to you based on permission and type. The list number, record ID or unique record name can be used for selection when creating an SSH Proxy session. |
|
connect or conn |
The Connect command is used to connect to the record defined by its list number, record ID or record name. You can only connect by record name if the name is unique. |
|
filter or filt |
The Filter command is used to filter the list of available records that is returned. You can add -i to ignore case. |
|
less |
The Less command adds pagination to the list of available records. Use q to exit pagination and return to the prompt. |
|
exit |
The Exit command closes the SSH proxy session. |
TIP: You can use the TAB key to auto complete commands.
Use the connect or conn command to connect to an available record and when you are finished use the exit command to complete your session.
Connecting Directly to a Managed Endpoint
In some scenarios, using the PAM SSH Proxy Interface can be more time consuming if you already know which record you want to connect to, or you have several saved.
For these situations, the SSH Proxy also supports direct connections to a specific record by bypassing the PAM SSH Proxy Interface all together.
To connect directly to a record managing your ssh-enabled endpoint, open your SSH client and enter the PAM host and port as provided to you by your System Administrator.
- At the user login prompt, you will enter a connection string as shown demonstrated in the example scenario below.
- We want to directly connect using our record with the name Unix Production Server and a record ID i-25ie3rUEx0i.
- At the SSH proxy login prompt, we will enter the string john#Unix Production Server or john#i-25ie3rUEx0i where john is our login name for PAM.
- Hit the Enter key and you will be greeted with the message PAM Secure Shell Proxy indicating that you are connecting to the PAM SSH Proxy.
- At the next prompt, enter your password, followed by the Enter key again and in a moment your SSH client will connect to the ssh-enabled endpoint stored in this record.
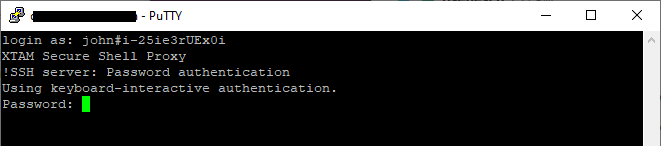
NOTE: To connect directly using the record name, the name must be unique. If two or more records exist with the same name, then you must use the record ID to connect as that is always a unique value.
- When you are finished with your SSH proxy session, simply use your normal Exit or Logout command to complete your session.
Connecting with an SSH Tunnel
The SSH Proxy feature in PAM can also be used to connect to an SSH Tunnel to make internal systems like databases, externally available through a native desktop client.
Connecting with an SSH Tunnel is an advanced option so we would encourage you to read our SSH Tunnel article for more information.
Windows Remote PowerShell access
Custom port and protocol for Windows Remote PowerShell access options allow to execution of password reset and other remote job scripts on the servers with custom PowerShell port and protocol.
-
ServicePort: [Number] (default 5985)
- EnabledSSL: [Checkbox] (default off)